
Microsoft Agent Framework Tutorial: Build AI Agents and Workflows in .NET
Learn how to build AI agent workflows in .NET using Microsoft Agent Framework. Step-by-step beginner-friendly tutorial with real-world examples.
Have you ever tried building an application that uses Artificial Intelligence? If so, you probably started exactly where most developers do in their journey. You sent a string of text to an API, waited a few seconds for the cloud to process it, and displayed the resulting response on a screen. That is the traditional prompt and response model. It works incredibly well for simple chatbots, basic text summarization, or answering straightforward questions. However, what happens when your application needs to solve a complex, multi-step problem? What if the application needs to read a block of raw source code, check it for syntax errors, analyze it for security vulnerabilities, and then generate a comprehensive audit report?
A single prompt sent to a single AI model is simply not enough for complex workflows. The AI inevitably gets confused. It loses track of the context midway through the task, hallucinates incorrect information, or simply fails to follow a long, intricate list of instructions. This is exactly where the concept of AI agents comes into play, fundamentally changing how we design intelligent software. Instead of relying on one massive, monolithic brain trying to do everything at once, you break the complex work down into smaller, highly specialized units called agents.
Microsoft has closely observed this shift in how the industry builds intelligent applications. In response, they have introduced the Microsoft Agent Framework. This is an open-source SDK designed specifically for .NET and Python developers. It provides a highly structured, production-ready way to build, test, and orchestrate multi-agent systems seamlessly.
In this comprehensive guide, we will explore exactly what the Microsoft Agent Framework is, how it works under the hood, and why it matters for modern developers. We will also roll up our sleeves and build a fully functional multi-agent workflow from scratch using .NET 9 and C#. Whether you are completely new to the world of AI development or you have already experimented with earlier tools like Semantic Kernel, this guide will give you everything you need to start building scalable AI systems.
The Shift: From Simple Prompts to Autonomous AI Agents
Before we write a single line of code, we need to clarify what an AI agent actually is. The term agent gets thrown around a lot in tech circles these days, often accompanied by a lot of marketing jargon, but the underlying concept is beautifully simple and intuitive.
An AI agent is a focused software component powered by a Large Language Model. However, unlike a basic chatbot, it is designed to perform one specific task, follow strict systemic instructions, and optionally use external tools to interact with the outside world.
Consider a real-world analogy to make this concrete. Think about how a high-end, professional restaurant kitchen operates during a busy dinner service. You do not have one single person taking the orders, chopping the vegetables, cooking the meat, plating the food, and washing the dishes. That approach would be chaotic, inefficient, and prone to catastrophic failure. Instead, you have a highly organized system of specialists. You have a Host to manage seating, a Prep Chef to ready the ingredients, a Grill Chef to cook the proteins, and a Dishwasher to clean the plates. Each person has a specific role, a clear set of instructions, and the right tools for their exact job. They communicate and coordinate with each other to deliver a fantastic meal to the customer.
In the software engineering world, a multi-agent system operates exactly the same way. You might create a specific Code Review Agent that has the ability to read C# files. Then, you might have a Security Agent that takes that code and scans it for vulnerabilities. Finally, a Report Agent steps in to review the findings and format them into an actionable summary.
By breaking complex, ambiguous tasks down into specialized agents, your AI system becomes significantly more reliable. It is much easier to debug because if the final report misses a SQL injection vulnerability, you know exactly which agent made the mistake and where to adjust the instructions. It is also significantly easier to scale and maintain as your application requirements grow over time.
Why Do We Need the Microsoft Agent Framework?
If you have been following the rapidly evolving .NET AI ecosystem over the last couple of years, you might be asking a very valid question. Why do we need yet another framework? Microsoft already has Semantic Kernel, which is widely used, and the open-source community heavily relies on frameworks like AutoGen.
The Microsoft Agent Framework does not exist to replace these earlier efforts. Instead, it serves as an evolution. It builds upon their foundational concepts and lessons learned to create a unified, robust, and truly production-ready engine.
Early AI frameworks were absolutely fantastic for rapid prototyping. They allowed developers to quickly stitch together prompts and API calls to see if an idea was feasible. However, when engineering teams tried to move those prototypes into enterprise production environments, they hit severe roadblocks. They needed robust, predictable error handling. They needed proper dependency injection that aligns with modern ASP.NET Core standards. They needed robust state management to remember long conversations across different user sessions reliably. They also desperately needed observability to track exactly what the AI models were doing under the hood, how many tokens they were consuming, and how long each step took.
The Microsoft Agent Framework was engineered specifically to solve these enterprise-grade problems. It brings a familiar, highly structured approach to agentic AI. If you already know how to build an ASP.NET Core web API, you will feel completely right at home using this framework.
One of the standout features is its deep integration with OpenTelemetry. This means you can easily monitor your agents using tools like Application Insights, Datadog, or Grafana. It also offers robust middleware support. This allows developers to inject safety checks, code scanners, or business compliance rules seamlessly before the AI ever generates a final response to the user. Furthermore, it provides pluggable memory architectures, allowing your agents to store long-term context safely in vector databases or traditional data stores like Redis.
Most importantly, the framework embraces flexibility. You are never locked into a single AI provider. Through the use of standard abstractions, you can seamlessly switch between Azure OpenAI, Anthropic Claude, Google Gemini, or even locally hosted models running via Ollama.
Core Concepts of the Framework
To successfully architect and build applications with the Microsoft Agent Framework, you need to deeply understand three foundational concepts. These core pillars are Agents, Workflows, and Memory.
1. Agents and Tool Calling
As we discussed earlier, an agent is the fundamental worker bee of your application. When you define an agent in this framework, you give it a distinct, isolated identity. You provide a descriptive name and a set of system instructions. These instructions dictate how the agent should behave, what persona it should adopt, and what rules it must strictly follow. You also assign it a specific AI model to act as its cognitive engine.
What makes agents truly powerful, however, is their ability to use tools. In the Microsoft Agent Framework, you can write standard C# methods and expose them to your agents as tools. For example, you could write a C# method that queries a GitHub repository for the latest commits. You then give that tool to a Repository Agent. When a user asks about recent changes, the LLM will intelligently decide to call your C# method, retrieve the live data, and formulate a natural language response based on the actual source code history.
2. Orchestration and Workflows
Having a team of highly capable agents is great, but they need to know how to collaborate effectively. A workflow dictates exactly how information flows from one agent to another and who is responsible for the next step. The framework provides built-in support for several common workflow patterns.
The most straightforward pattern is a Sequential Workflow. In this setup, the process moves in a straight line. Agent A does its job and passes its output directly to Agent B. Agent B does its job and passes the combined output to Agent C. This pattern is highly predictable, easy to test, and perfect for linear pipelines like multi-language translation, document summarization, or code reviewing.
Another powerful pattern is the Concurrent Workflow. In this scenario, multiple agents work on different parts of a complex problem at the exact same time. For instance, while one agent checks a document for spelling errors, another agent simultaneously checks it for factual inaccuracies. A final agent then aggregates their parallel findings into a single report.
For much more dynamic and unpredictable scenarios, developers can utilize a Group Chat Workflow. In this pattern, multiple agents converse with each other organically in a shared environment to solve a problem. It behaves almost identically to a team of human developers brainstorming in a Microsoft Teams channel, complete with debates and consensus-building.

3. State and Memory Management
By default, LLMs are stateless. They forget everything the moment a single API request is completed. However, production applications almost always require context and memory. The framework provides sophisticated mechanisms to maintain state across interactions. This means an agent can remember exactly what a user said three days ago and seamlessly use that historical context to provide a much better, personalized answer today.
Building Your First Multi-Agent System in .NET
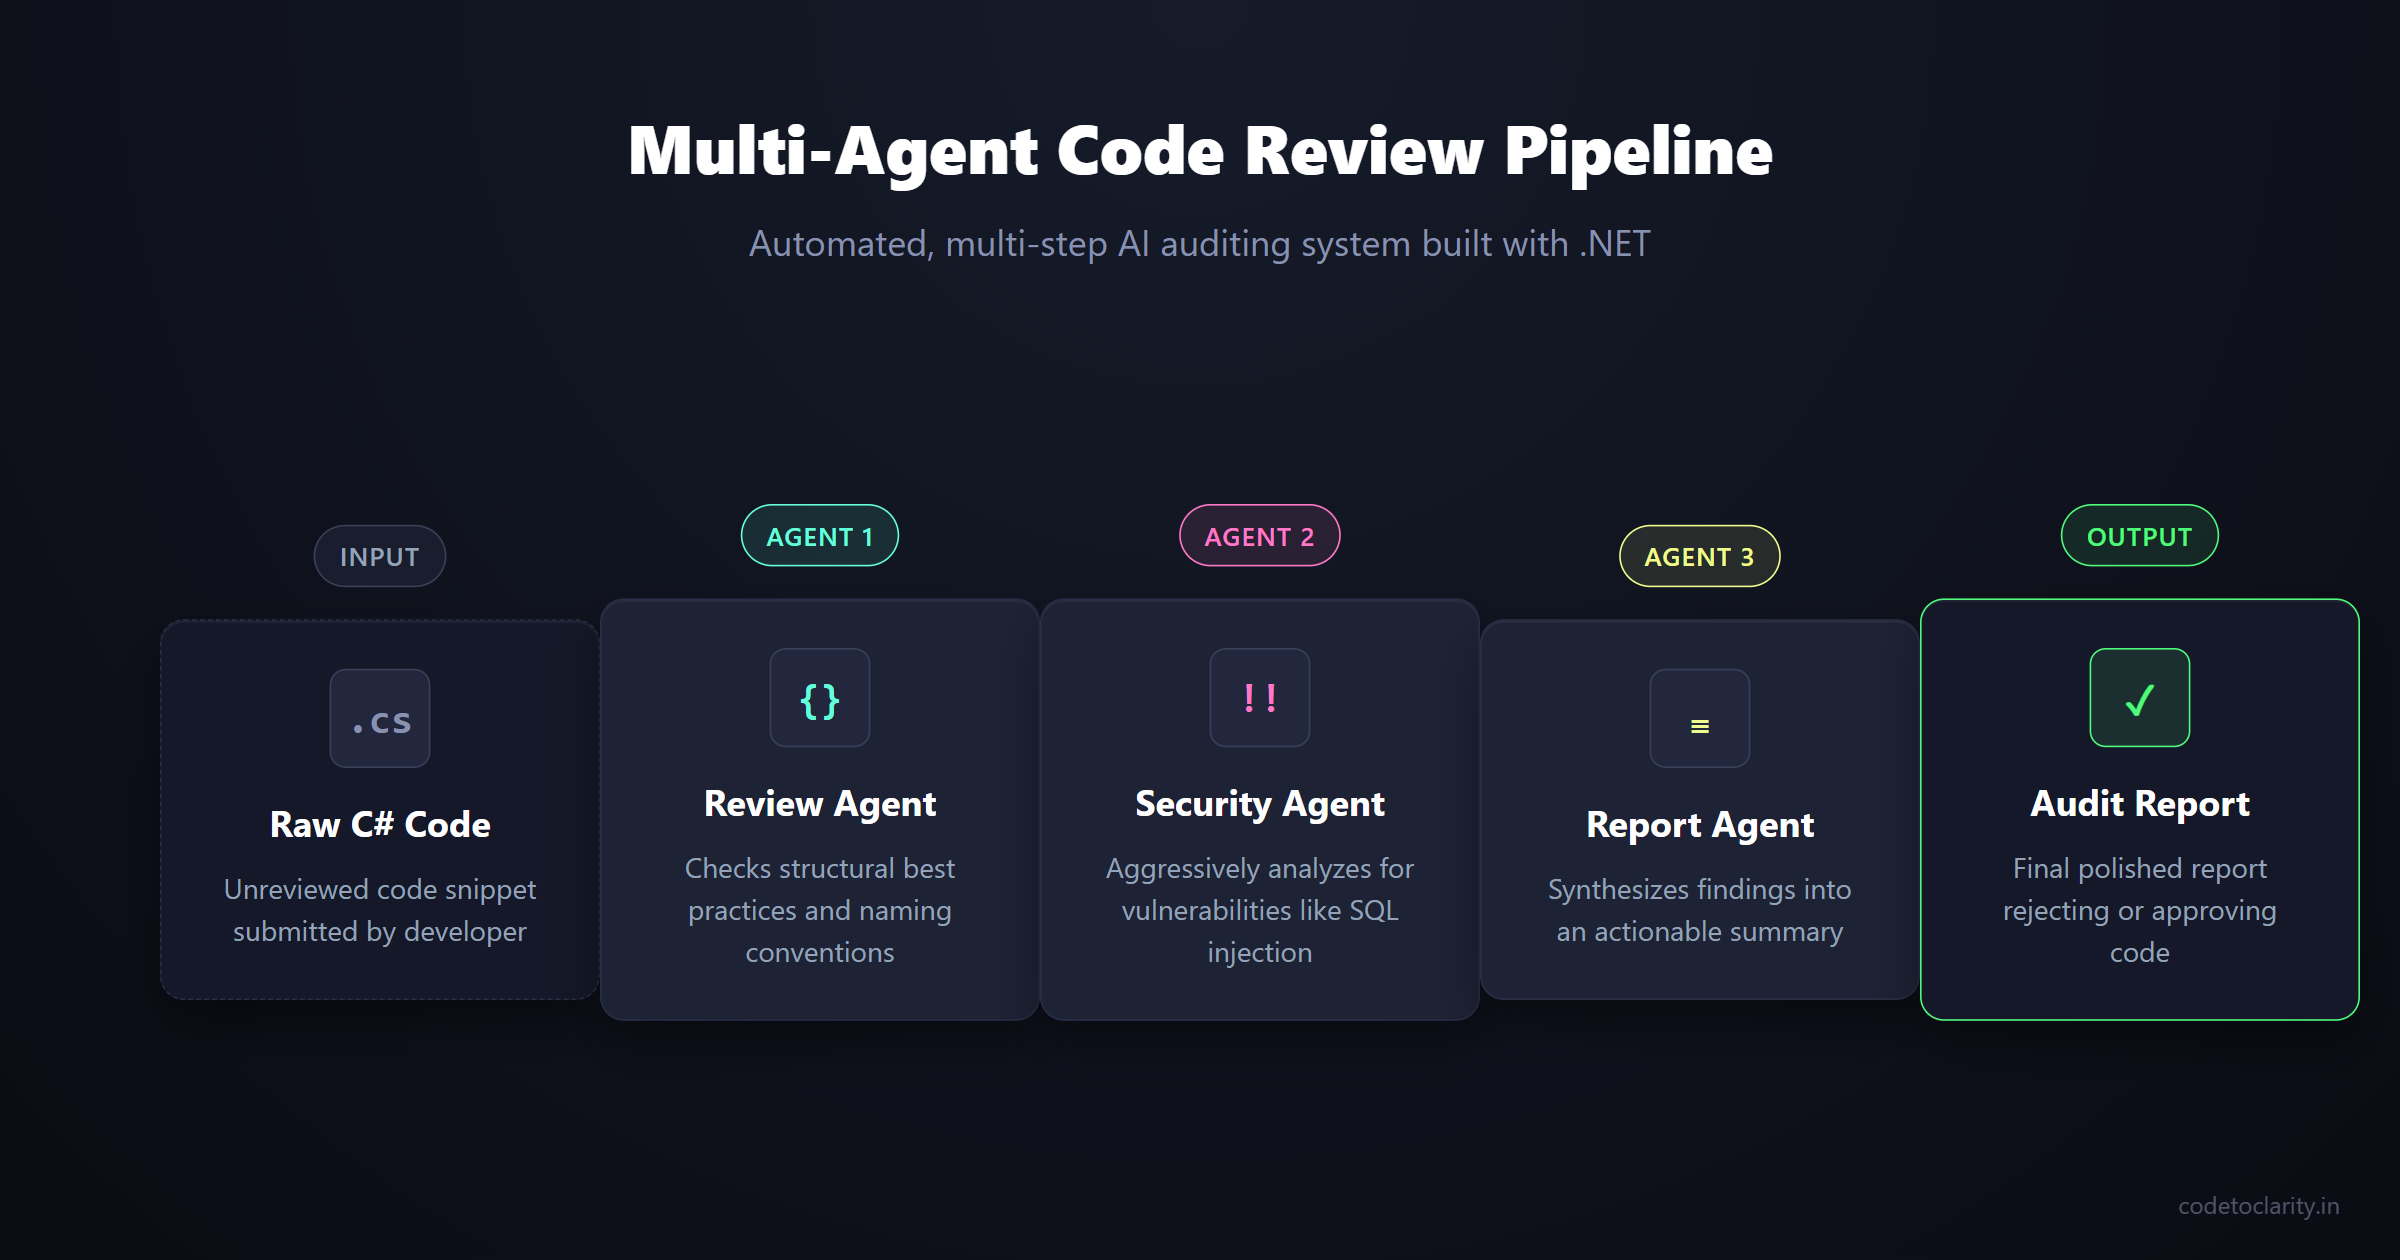
Now that we understand the deep theory and architecture, let us write some practical code. We are going to build an automated Code Review Pipeline. This pipeline will take a raw, unreviewed snippet of C# code from a developer and run it through three distinct, specialized agents to produce a polished audit report.
First, the CodeToClarity Review Agent will check the snippet for structural best practices, naming conventions, and common code smells. Next, the CodeToClarity Security Agent will aggressively analyze that same code specifically looking for security vulnerabilities like SQL injection or cross-site scripting. Finally, the CodeToClarity Report Agent will synthesize the findings from the previous two steps into a clear, actionable summary for the developer.
Step 1: Setting Up the .NET Project
First, open your favorite terminal and create a new .NET 9 console application.
dotnet new console -n CodeToClarity.CodeReviewer
cd CodeToClarity.CodeReviewer
Next, you need to install the required NuGet packages. We need the core agent orchestration libraries and the extensions required for connecting to AI models. You can find extensive documentation about these specific extensions on the official NuGet repository.
dotnet add package Microsoft.Agents.AI --prerelease
dotnet add package Microsoft.Agents.AI.Workflows --prerelease
dotnet add package Microsoft.Extensions.AI.OpenAI
Step 2: Configuring the AI Chat Client
We need a secure way to communicate with an underlying AI model. For this educational example, we will use a model provided by GitHub Models. Thanks to the framework abstractions, you can easily swap this out for Azure OpenAI or another provider later without changing your agent logic.
Open your Program.cs file and set up the chat client infrastructure.
using Microsoft.Agents.AI;
using Microsoft.Agents.AI.Workflows;
using Microsoft.Extensions.AI;
using Azure.AI.OpenAI;
using System.ClientModel;

// Initialize the chat client using GitHub Models inference API
IChatClient chatClient = new OpenAIClient(
    new ApiKeyCredential("YOUR_GITHUB_API_KEY"),
    new OpenAIClientOptions { Endpoint = new Uri("https://models.github.ai/inference") }
).AsChatClient("gpt-4o-mini");
This specific code snippet establishes a connection to the highly capable GPT-4o-mini model. It implements the standard IChatClient interface, which is the foundational abstraction the entire agent framework relies on heavily.
Step 3: Defining the Specialized Agents
Next, we will create our three specialized agents. Each agent receives a specific name and a very clear set of system instructions defining its exact purpose.
Let us start with the Review Agent.
AIAgent reviewAgent = new ChatClientAgent(
    chatClient,
    new ChatClientAgentOptions
    {
        Name = "CodeToClarityReviewer",
        Instructions = "You are an expert software engineer. Review the provided C# code for best practices, naming conventions, and code smells. Do not write new code, just list the issues clearly in bullet points."
    });
Now we create the Security Agent. Notice how the system instructions explicitly tell it to focus only on vulnerabilities, leaving the stylistic review to the previous agent.
AIAgent securityAgent = new ChatClientAgent(
    chatClient,
    new ChatClientAgentOptions
    {
        Name = "CodeToClaritySecurityScanner",
        Instructions = "You are a strict security auditor. Take the provided C# code and the previous review notes. Analyze the code specifically for security vulnerabilities. Highlight any critical risks immediately."
    });
Finally, we create the Report Agent to review the final output and add managerial value.
AIAgent summaryAgent = new ChatClientAgent(
    chatClient,
    new ChatClientAgentOptions
    {
        Name = "CodeToClarityReportGenerator",
        Instructions = "You are an engineering manager. Review the findings from the previous agents. Generate a final, actionable summary report indicating if the code is approved or if changes are required. Keep it concise."
    });
By explicitly keeping these agents separate, we make the entire system incredibly modular and maintainable. If we decide we want a stricter security policy later, we only need to update the instructions for the Security Scanner agent. The Reviewer and Report Generator remain completely untouched, drastically reducing regression bugs.
Step 4: Orchestrating the Sequential Workflow
We have our workers ready, but they do not inherently know how to collaborate yet. We need to build a formal workflow. Since our tasks naturally flow logically from one step directly to the next, a sequential workflow is the absolutely perfect choice.
AIAgent codetoclarityPipeline = await AgentWorkflowBuilder
    .BuildSequentialAsync(
        reviewAgent,
        securityAgent,
        summaryAgent)
    .AsAgentAsync();
The AgentWorkflowBuilder utility takes our individual, isolated agents and wraps them into a single, cohesive workflow agent. To the outside application calling this pipeline, it looks exactly like one single agent. This completely hides all the internal complexity and orchestration.
Step 5: Running the Pipeline
The final step is to trigger the workflow with a raw code snippet and display the step-by-step results in the console.
Console.WriteLine("Enter a C# code snippet to review:");
string codeSnippet = Console.ReadLine() ?? "public void GetUser(string id) { var query = \"SELECT * FROM Users WHERE Id = \" + id; }";

Console.WriteLine("\nProcessing your code across multiple agents. This may take a moment.\n");

AgentRunResponse response = await codetoclarityPipeline.RunAsync(codeSnippet);

foreach (var message in response.Messages)
{
    Console.WriteLine($"--- Generated by: {message.AuthorName} ---");
    Console.WriteLine(message.Text);
    Console.WriteLine();
}
When you compile and run this application using the default SQL injection snippet above, you will witness a fascinating process unfold before your eyes. First, the Reviewer will analyze the code and point out poor variable naming or missing access modifiers. Immediately after, the Security Scanner will aggressively flag the glaring SQL injection vulnerability caused by string concatenation. Finally, the Report Generator will synthesize these findings into a final document that rejects the code and demands parameterized queries. You have successfully built a fully automated, multi-step AI auditing system in just a few dozen lines of elegant C# code.
Exploring Real-World Enterprise Use Cases
The code review pipeline we just built is an excellent learning tool, but the Microsoft Agent Framework is capable of handling much more complex, mission-critical tasks. Forward-thinking developers are already using these multi-agent patterns to solve major, real-world business problems.
Consider enterprise customer support triage. When a frustrated user submits a support ticket, a multi-agent workflow can handle the initial processing instantly. An initial triage agent categorizes the ticket based on the natural language text. A specialized database agent securely retrieves the customer purchase history and support tier. A highly technical agent then searches the internal documentation repository for a known solution. Finally, a response agent drafts a polite, helpful email to the customer. All of this orchestration happens in mere seconds entirely without human intervention.
Intelligent travel itinerary planning is another excellent, high-value use case. When a user requests a complex vacation plan, an initial preference agent categorizes their budget and desired climate. A flight agent securely queries airline APIs to find the best routes. A hotel agent simultaneously searches for accommodations that fit the budget. Finally, a concierge agent drafts a beautiful, cohesive day-by-day itinerary. If you want to dive deeper into these architectural patterns, the official Microsoft documentation on AI provides exceptional, deep insights into how you can structure these enterprise solutions securely and effectively. Furthermore, exploring the source code directly on the Microsoft Agent Framework GitHub Repository is a fantastic way to see how the core team is building the future of the framework.
Looking Ahead: The Future of .NET and AI
We are rapidly and decisively moving away from basic, single-turn AI chatbots towards highly autonomous, goal-oriented software systems. The Microsoft Agent Framework provides the essential, battle-tested infrastructure needed to build these ambitious systems reliably in production environments.
As the framework continues to evolve and mature, we can confidently expect deeper integration with Azure cloud services, more sophisticated and performant memory providers, and vastly better diagnostic tooling for debugging complex, long-running workflows. By taking the time to learn these concepts today, you are actively positioning yourself at the absolute forefront of the next massive evolutionary shift in software engineering. You are no longer just writing procedural code that executes static instructions. You are architecting digital teams that can reason about problems, collaborate with each other, and solve complex challenges dynamically.

Kishan Kumar
Software Engineer / Tech Blogger
A passionate software engineer with experience in building scalable web applications and sharing knowledge through technical writing. Dedicated to continuous learning and community contribution.