
Essential Security Headers Every .NET Developer Should Implement
Protect your .NET app with HTTP security headers. Step-by-step guide to implementing CSP, HSTS, and more. Beginner-friendly with real code examples.
You've spent weeks, maybe months, crafting the perfect ASP.NET Core application. Your Dependency Injection is clean, your database queries are optimized, and your UI is stunning. You've implemented token-based authentication (maybe even reading up on how JWT works to get it just right), and you feel pretty good about your security posture.
But what if I told you that despite all your hard work, your application might still be wide open to a host of common web vulnerabilities?
Welcome to the world of HTTP security headers. These are the unsung heroes of web security—simple directives that tell the browser exactly how to behave when interacting with your application. In this comprehensive guide, we are going to dive deep into what security headers are, why they are absolutely critical, and exactly how you can implement them in your ASP.NET Core applications to build a fortress around your users' data.
What Exactly Are HTTP Security Headers?
To understand security headers, we first need to take a step back and look at how the web actually works. Every time a user types your website's URL into their browser or clicks a link, a conversation happens between their browser (the client) and your ASP.NET Core application (the server).
This conversation happens via HTTP (Hypertext Transfer Protocol). The client sends an HTTP Request, asking for a page, an image, or some data. Your server responds with an HTTP Response, which contains the requested content (like HTML or JSON).
But alongside that content, your server also sends HTTP Headers. Think of these headers as the metadata of the conversation. They are hidden from the average user, but they provide critical instructions to the browser. They dictate how long to cache a file, what type of content is being returned, and—most importantly for us—what security rules the browser must enforce.
Security headers are specific HTTP response headers designed to restrict the actions a browser can take. By configuring these headers correctly, you can instantly neutralize entire categories of attacks, such as Cross-Site Scripting (XSS), Clickjacking, and MIME-sniffing.
The best part? Implementing these headers requires zero changes to your business logic. You just add them to the response pipeline, usually via Middleware in ASP.NET Core, and the browser does the rest of the heavy lifting.
Let's break down the most essential security headers, understand the exact vulnerabilities they prevent, and see how to add them to your .NET projects.
The Clickjacking Threat: X-Frame-Options
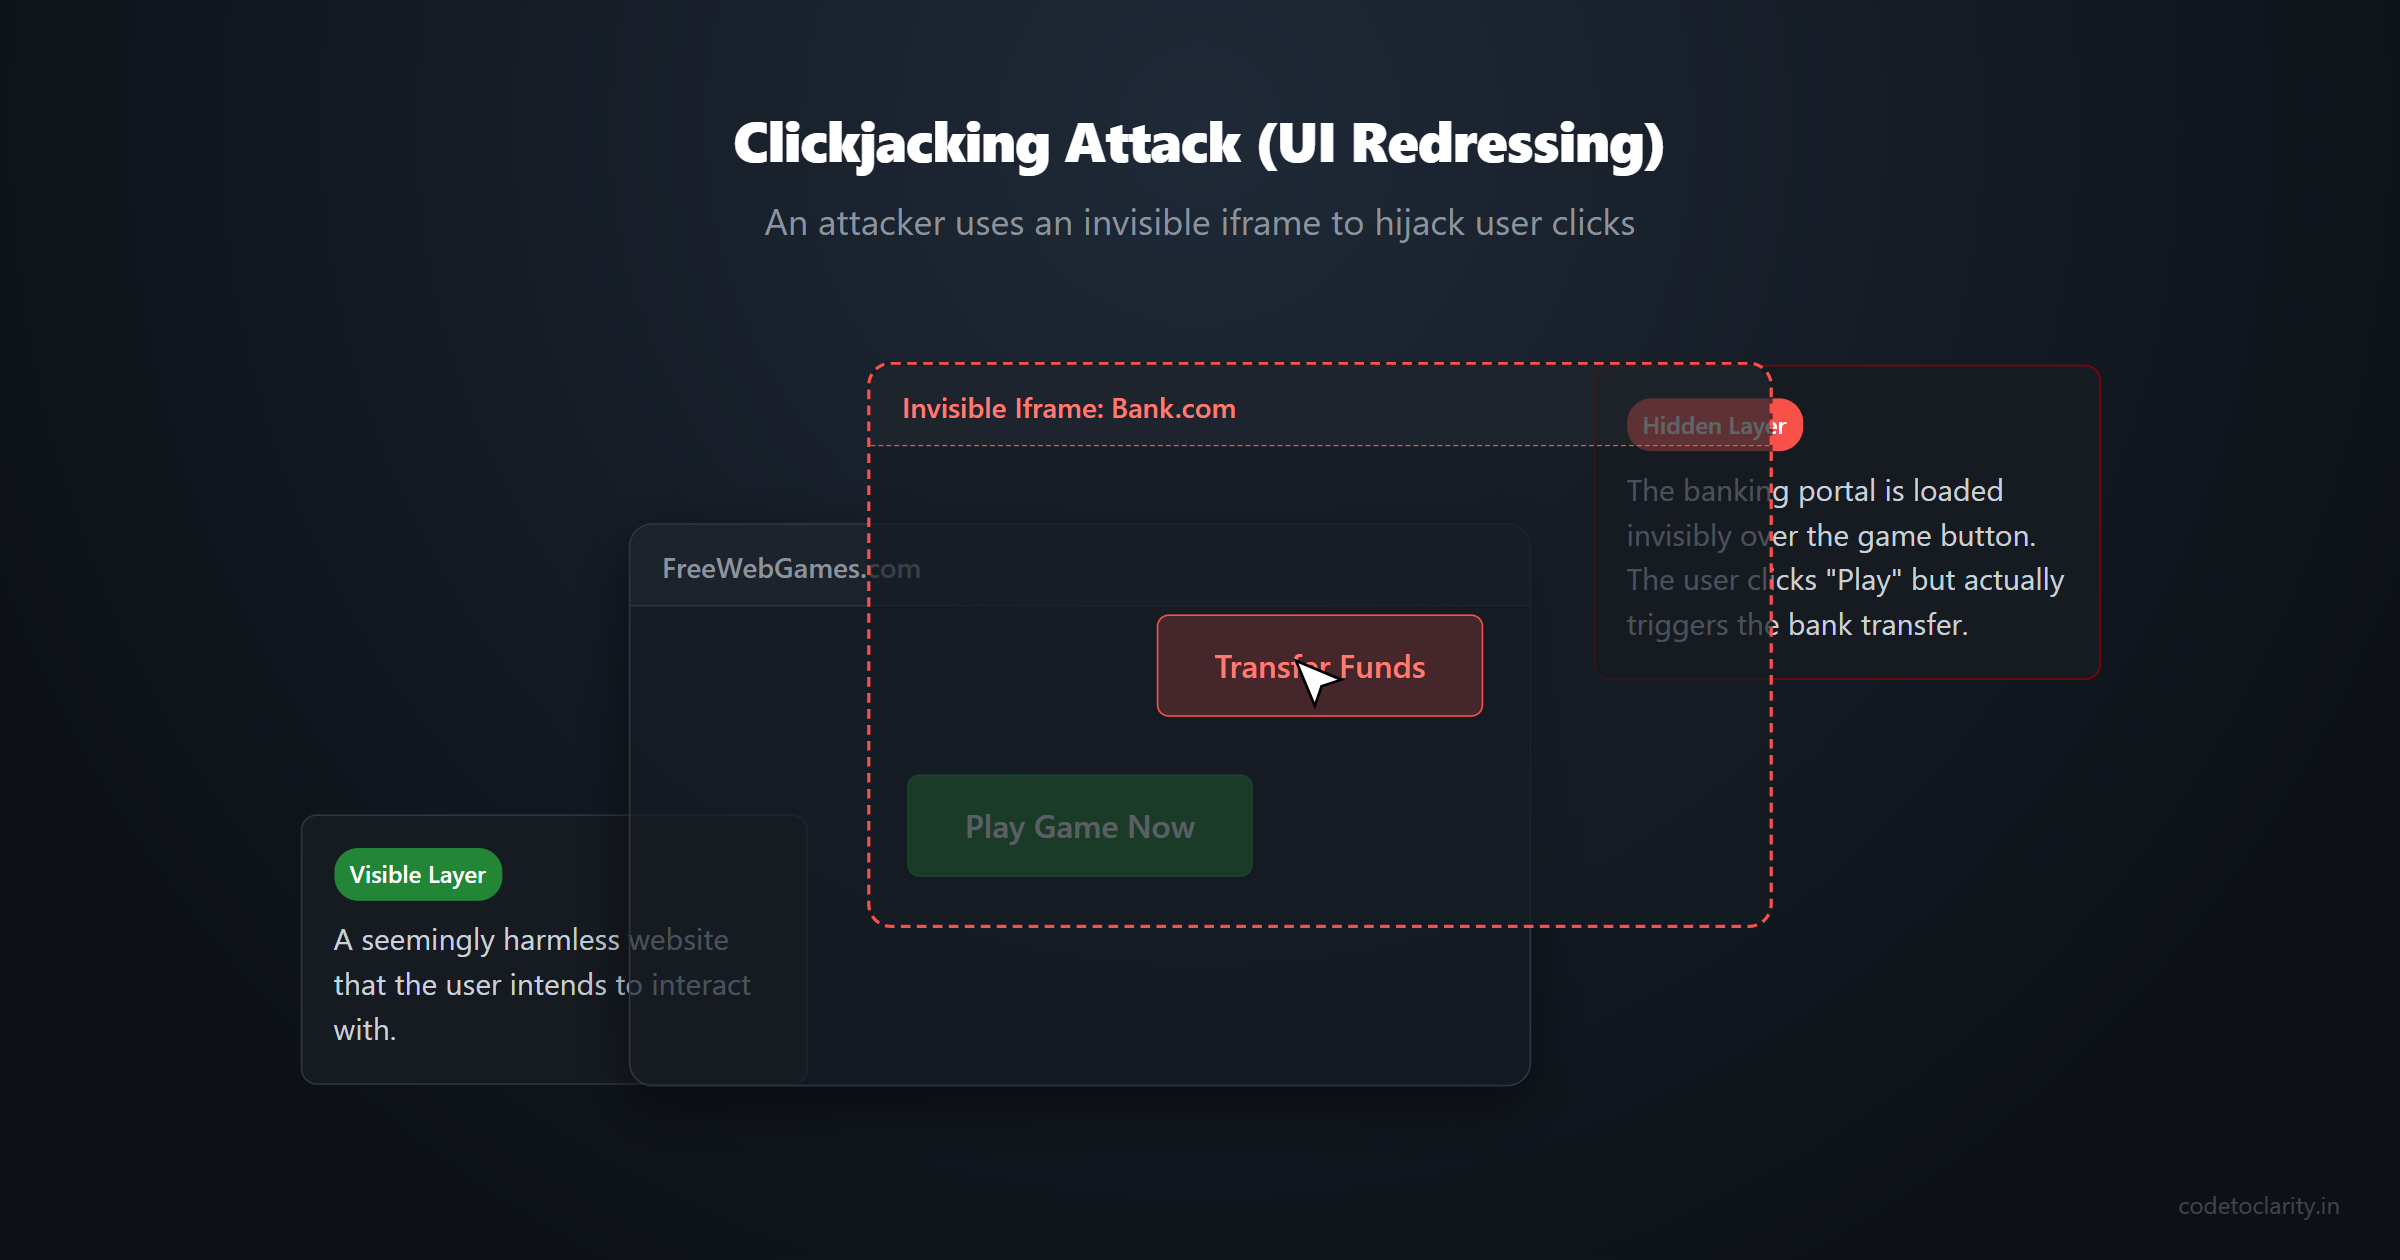
Imagine this scenario: you log into your banking application. Meanwhile, in another tab, you visit a seemingly harmless site to play a free web game. Unbeknownst to you, that game site has secretly loaded your banking portal inside an invisible <iframe> positioned exactly over the "Play Game" button.
When you click "Play Game," your click passes right through the invisible layer and hits the "Transfer Funds" button on the banking app. Because you were already authenticated, the transfer goes through.
This terrifying attack is known as Clickjacking (or UI redressing). The attacker tricks the user into clicking something different from what they perceive, effectively hijacking their clicks.
The Solution: X-Frame-Options
The X-Frame-Options header was created specifically to combat clickjacking. It instructs the browser on whether your site is allowed to be rendered within a <frame>, <iframe>, <embed>, or <object>.
There are two modern directives you can use:
DENY: This is the most secure option. It tells the browser that under no circumstances should this page be displayed in a frame, even if the frame is on the same exact domain.SAMEORIGIN: This allows the page to be displayed in a frame, but only if the framing site is on the exact same origin (domain) as the page itself.
If you don't have a specific feature in your app that requires framing your own content, you should always default to DENY.
Here is how you might add it using a simple custom middleware approach in your ASP.NET Core pipeline:
app.Use(async (codetoclarityContext, next) =>
{
    codetoclarityContext.Response.Headers.Add("X-Frame-Options", "DENY");
    await next();
});
With just that one line, clickjacking attempts against your site are completely neutralized.
Stopping the MIME Sniffing Trap: X-Content-Type-Options
To understand this header, we need to understand a peculiar behavior built into older browsers called "MIME sniffing."
When your server sends a file to the browser, it includes a Content-Type header (e.g., text/html, image/jpeg, application/javascript). This tells the browser how to interpret the file. However, historically, many web servers were misconfigured and sent incorrect content types. To "help" the user, browsers implemented a feature where they would inspect (or "sniff") the contents of the file. If the file looked like JavaScript, the browser would execute it as JavaScript, regardless of what the Content-Type header claimed.
The Attack Vector
Attackers weaponized this helpful feature. Suppose you have an application that allows users to upload profile pictures. An attacker uploads a file named innocent-picture.jpg. Your server accepts it, stores it, and serves it with a Content-Type: image/jpeg.
But wait—the attacker actually put malicious JavaScript code inside that file. When another user visits the site, their browser downloads the "image," sniffs the content, realizes it contains executable script, and runs it! The attacker just achieved a Cross-Site Scripting (XSS) attack via an image upload.
The Solution: X-Content-Type-Options
The X-Content-Type-Options header is the off-switch for MIME sniffing. It has only one valid directive: nosniff.
When the browser sees this header, it promises to strictly honor the Content-Type provided by the server. If the server says it's an image, the browser will treat it as an image. If it contains script, the browser refuses to execute it.
Implementing this in .NET is incredibly straightforward:
app.Use(async (codetoclarityContext, next) =>
{
    codetoclarityContext.Response.Headers.Add("X-Content-Type-Options", "nosniff");
    await next();
});
Always include this header. There is virtually no downside, and it permanently closes a sneaky attack vector.
Enforcing Secure Connections: HTTP Strict Transport Security (HSTS)
We all know we need HTTPS. It encrypts the traffic between the client and the server, preventing attackers on public Wi-Fi networks from eavesdropping or tampering with the data.
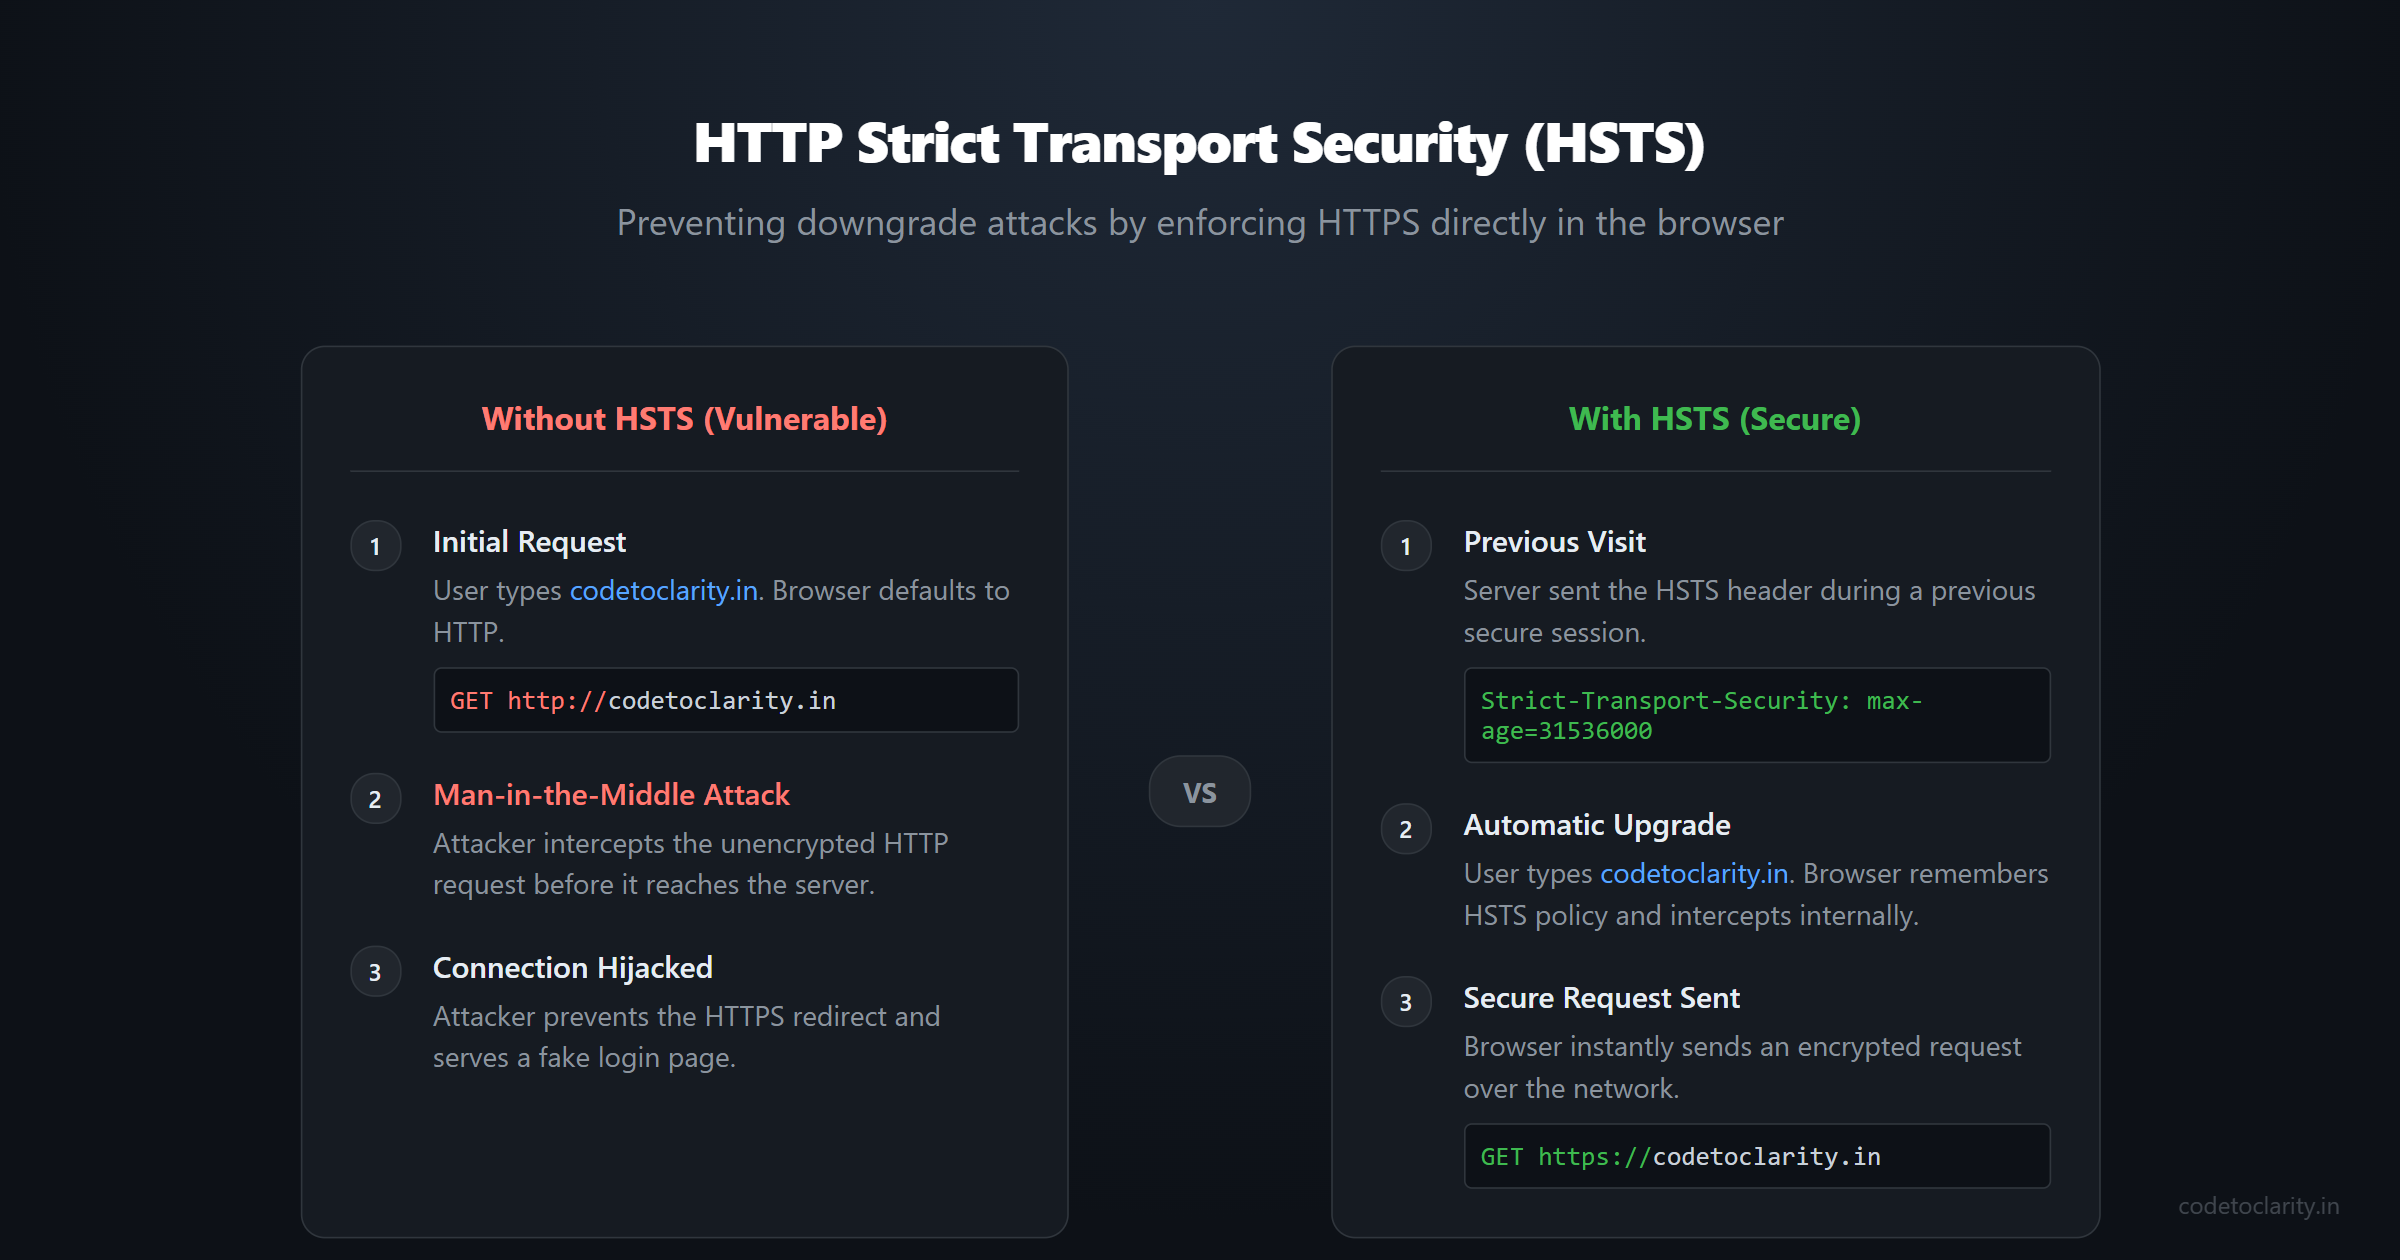
But having an SSL certificate isn't enough. When a user types codetoclarity.in into their address bar, the browser defaults to an insecure http:// request. Your server will typically respond with a 301 Redirect to the secure https:// version.
That initial HTTP request is a vulnerability. An attacker intercepting traffic (a Man-in-the-Middle attack) can intercept that first unencrypted request and prevent the redirect to HTTPS. Instead, they proxy the traffic, serving the user a fake, unencrypted version of your site while silently communicating with your real server in the background. The user enters their credentials, and the attacker captures them.
The Solution: Strict-Transport-Security
The HSTS header is your defense against this downgrade attack. It tells the browser: "From now on, never use HTTP to access this site. Only use HTTPS, and do this automatically before even sending a request over the network."
The header looks something like this:
Strict-Transport-Security: max-age=31536000; includeSubDomains
max-age: Tells the browser how long (in seconds) to remember this rule.31536000is one year.includeSubDomains: Applies the rule to all subdomains (e.g.,api.yoursite.com).
Implementing HSTS in ASP.NET Core
ASP.NET Core provides built-in support for HSTS. You don't need to write custom middleware for it. In your application setup, you simply configure and add it to the pipeline.
var codetoclarityBuilder = WebApplication.CreateBuilder(args);

// Configure the HSTS options
codetoclarityBuilder.Services.AddHsts(options =>
{
    options.Preload = true;
    options.IncludeSubDomains = true;
    options.MaxAge = TimeSpan.FromDays(365);
});

var app = codetoclarityBuilder.Build();

// We only want HSTS in production, as it can make local development over HTTP difficult
if (!app.Environment.IsDevelopment())
{
    app.UseHsts();
}

app.UseHttpsRedirection();
For more details on configuring HTTPS properly, the authoritative source is the Microsoft Docs on Enforcing SSL.
The Ultimate Shield: Content-Security-Policy (CSP)
If security headers were the Avengers, Content-Security-Policy (CSP) would be Iron Man. It is the most complex, the most difficult to configure, and by far the most powerful tool in your arsenal.
CSP was designed as a sweeping defense against Cross-Site Scripting (XSS) and data injection attacks.
By default, web browsers are incredibly trusting. If a webpage says "load this script from evil-hacker.com/malware.js", the browser shrugs and executes it. This is why XSS is so dangerous; if an attacker can inject a script tag into your HTML (e.g., via a compromised comment section), the browser will execute it with full access to the user's session.
The Solution: An Allowlist for Your Web App
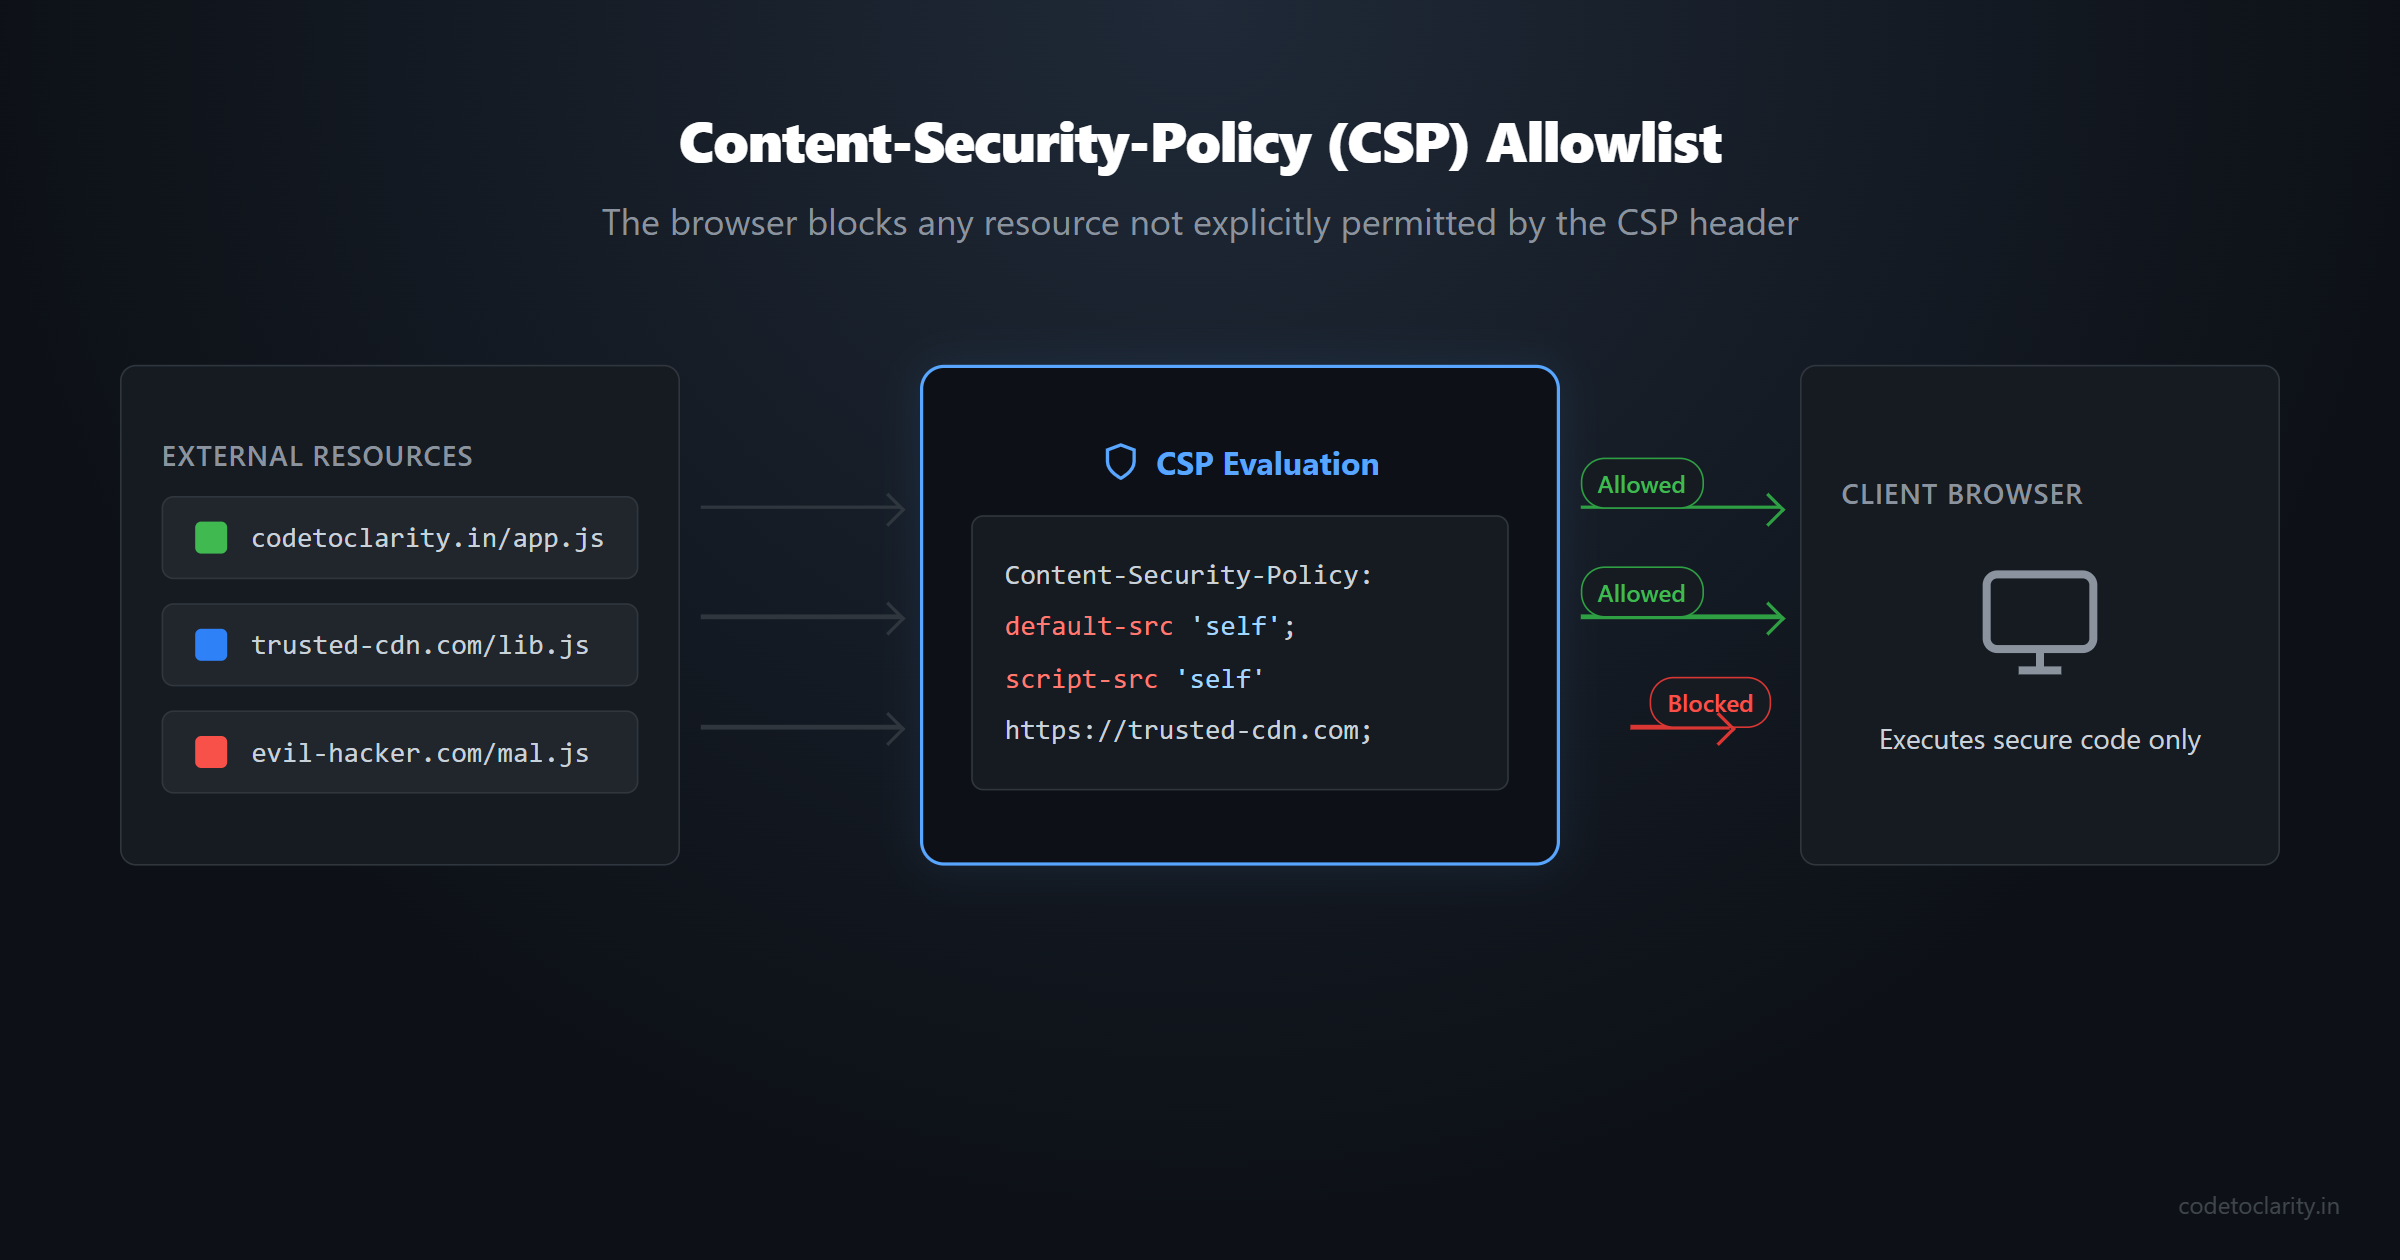
CSP turns this trust model upside down. It allows you to define a strict allowlist of approved sources for every type of resource your page might load. If a resource isn't on the list, the browser blocks it outright.
A CSP header is made up of "directives" that control specific resource types. For example:
default-src: The fallback rule for anything not explicitly defined.script-src: Where JavaScript is allowed to load and execute from.style-src: Where CSS is allowed to load from.img-src: Where images can be loaded from.connect-src: Where your frontend code is allowed to make AJAX/Fetch requests.
A basic CSP might look like this:
Content-Security-Policy: default-src 'self'; img-src *; script-src 'self' https://trusted-cdn.com;
This policy says:
- By default, only load resources from my own domain (
'self'). - Images can be loaded from anywhere (
*). - Scripts can only be loaded from my own domain OR from
trusted-cdn.com. Any inline scripts will be blocked immediately!
Implementing CSP in .NET
Because CSP can easily break your site by blocking legitimate scripts or styles, it requires careful implementation:
app.Use(async (codetoclarityContext, next) =>
{
    var cspRules = "default-src 'self'; " +
                   "script-src 'self' https://cdn.jsdelivr.net; " +
                   "style-src 'self' 'unsafe-inline'; " +
                   "img-src 'self' data: https:; " +
                   "font-src 'self';";

    codetoclarityContext.Response.Headers.Add("Content-Security-Policy", cspRules);
    await next();
});
A Pro Tip for Rolling out CSP:
Implementing CSP on an existing, large application is terrifying because you will inevitably break something. Instead of enforcing the policy immediately, use the Content-Security-Policy-Report-Only header first.
This tells the browser to evaluate the policy, but instead of blocking the unauthorized resources, it just sends a JSON report to a logging endpoint of your choice. You can monitor these logs for a few weeks, adjust your policy until all legitimate resources are whitelisted, and then switch to the enforcing header.
If you want to dive deeper into the vast array of CSP directives, the MDN Web Docs for CSP are the gold standard reference.
The Ghost of Browsers Past: X-XSS-Protection
If you read tutorials written a few years ago, you will almost certainly see recommendations to include the X-XSS-Protection header.
Historically, this header was designed to turn on the built-in XSS filter in browsers like Internet Explorer, Chrome, and Safari. The idea was that if the browser detected that a script reflected in the request was also present in the response (a classic reflected XSS attack), it would block the script from executing.
It sounded great in theory, but in practice, it was a disaster. Security researchers quickly discovered that attackers could intentionally trigger the XSS auditor to block legitimate scripts on a page, effectively turning the security feature into a Denial of Service (DoS) weapon. Furthermore, the filter could be bypassed in numerous ways.
Because of these fundamental flaws, modern browsers have completely removed or deprecated the XSS auditor.
The Verdict: Do not use X-XSS-Protection. In fact, if you want to be explicitly clear to older browsers, you should send X-XSS-Protection: 0 to disable the flawed filter entirely. Rely on a strong Content-Security-Policy instead—it is the modern, robust way to handle XSS.
Controlling the Breadcrumbs: Referrer-Policy
When a user clicks a link on your website to go to another site, their browser kindly sends along a Referer (yes, it's famously misspelled in the official HTTP specification) header to the destination site. This header contains the URL of the page the user just came from.
This is great for analytics, but it can be a massive privacy and security leak. What if your URL contains sensitive data? For example, what if a password reset link looks like https://codetoclarity.in/reset?token=abc123secret? If the user clicks an external link from that page, the external site now has their secret token in its server logs!
The Solution: Referrer-Policy
This header lets you dictate exactly how much information the browser should send in the Referer header.
The most common and recommended directive for modern web apps is strict-origin-when-cross-origin.
Here is what it does:
- If a user navigates within your own site (e.g., from
/aboutto/contact), send the full URL. - If a user navigates to an external site, only send the domain (e.g.,
https://codetoclarity.in/), stripping away the path and sensitive query strings. - If a user navigates from a secure HTTPS page to an insecure HTTP page, send absolutely nothing.
Adding it to your pipeline:
app.Use(async (codetoclarityContext, next) =>
{
    codetoclarityContext.Response.Headers.Add("Referrer-Policy", "strict-origin-when-cross-origin");
    await next();
});
Locking Down Browser Capabilities: Permissions-Policy
Web browsers are incredibly powerful these days. They have APIs to access your webcam, microphone, geolocation, and even Bluetooth devices. If your application suffers an XSS attack, the malicious script could theoretically request access to the user's camera.
The Permissions-Policy (formerly known as Feature-Policy) header allows you to selectively enable, disable, and modify the behavior of these powerful browser APIs.
If you are building a standard line-of-business application, a blog, or an e-commerce site, you likely don't need access to the user's microphone. You can explicitly turn these features off.
app.Use(async (codetoclarityContext, next) =>
{
    // We are explicitly turning off camera, microphone, and geolocation
    codetoclarityContext.Response.Headers.Add("Permissions-Policy", "camera=(), microphone=(), geolocation=()");
    await next();
});
By explicitly denying these capabilities at the header level, you ensure that even if an attacker manages to execute JavaScript on your page, their attempt to access the webcam will be hard-blocked by the browser itself.
Silence is Golden: Removing Information Disclosure Headers
Security is often about giving attackers as little information as possible. By default, many web servers are quite chatty and love to brag about the software they are running.
If you inspect the response headers of an out-of-the-box ASP.NET Core application, you might see headers like:
Server: KestrelorServer: Microsoft-IIS/10.0X-Powered-By: ASP.NET
While knowing that you run a specific server doesn't immediately hack your site, it tells attackers exactly what exploits to search for. If a zero-day vulnerability is found tomorrow, attackers scanning the internet will immediately target your application.
It is considered a best practice to strip these headers entirely.
To remove the Server header when hosting with Kestrel, configure it in your Program.cs:
codetoclarityBuilder.WebHost.ConfigureKestrel(options =>
{
    options.AddServerHeader = false;
});
To remove headers added by the framework, you can clear them in your custom middleware before the response is sent:
app.Use(async (codetoclarityContext, next) =>
{
    codetoclarityContext.Response.Headers.Remove("X-Powered-By");
    codetoclarityContext.Response.Headers.Remove("Server");
    await next();
});
Streamlining Implementation: The NuGet Approach
While writing your own middleware is a great learning exercise, maintaining complex strings for Content-Security-Policy can get messy.
In the real world, I highly recommend using a dedicated, community-tested library. The absolute standard for this in the .NET ecosystem is the NetEscapades.AspNetCore.SecurityHeaders package by Andrew Lock.
This library provides a wonderful, strongly-typed fluent API for configuring all of the headers we just discussed.
After installing the NuGet package, you can set up a bulletproof security posture with extremely clean code:
var codetoclarityAppBuilder = WebApplication.CreateBuilder(args);
var app = codetoclarityAppBuilder.Build();

// Define your security policies
var codetoclarityPolicy = new HeaderPolicyCollection()
    .AddFrameOptionsDeny()
    .AddContentTypeOptionsNoSniff()
    .AddReferrerPolicyStrictOriginWhenCrossOrigin()
    .RemoveServerHeader()
    .AddPermissionsPolicy(builder =>
    {
        builder.AddCamera().None();
        builder.AddMicrophone().None();
        builder.AddGeolocation().None();
    })
    .AddContentSecurityPolicy(builder =>
    {
        builder.AddDefaultSrc().Self();
        builder.AddScriptSrc().Self().WithHash256("...");
        builder.AddStyleSrc().Self().UnsafeInline();
        builder.AddImgSrc().Self().Data();
    });

// Apply the policies early in the pipeline
app.UseSecurityHeaders(codetoclarityPolicy);
This approach is highly readable, less prone to typos, and makes managing a complex CSP a breeze.
Wrapping Up
Building a secure application is a multi-layered process. Security headers aren't a silver bullet; you still need to write secure code, sanitize your inputs, and utilize features like Global Exception Handling to ensure errors don't leak sensitive database details.
However, HTTP security headers provide an incredibly high return on investment. With just a few lines of configuration, you leverage the built-in power of modern web browsers to act as an invisible shield for your application, automatically neutralizing a massive array of common attacks.
Take a few minutes today, add that middleware or NuGet package to your ASP.NET Core project, and sleep a little better tonight knowing your application is significantly more secure.

Kishan Kumar
Software Engineer / Tech Blogger
A passionate software engineer with experience in building scalable web applications and sharing knowledge through technical writing. Dedicated to continuous learning and community contribution.