
Structured Logging with Serilog in .NET: A Practical Guide
Learn how to implement structured logging in .NET using Serilog. Step-by-step guide with practical examples, sinks configuration, and Seq integration for better log management.
If you have spent any significant amount of time building software, you already know the frustration of chasing down a bug in production. You get an alert that something is broken. You open your log viewer and start scrolling through thousands of lines of plain text. You are desperately searching for that one specific error message hidden somewhere in a massive wall of text.
Traditional logging often feels like searching for a needle in a haystack. It becomes even worse when your application scales up, traffic increases, and your log files become practically unreadable.
This is exactly where structured logging changes the game. Once you switch to a structured logging approach, you will never want to go back to the old way of writing logs. It transforms your logs from dead text files into a highly queryable, deeply searchable database of events.
In this comprehensive guide, we are going to explore how to implement structured logging in .NET 8 using Serilog. Serilog is arguably the most popular and powerful logging library in the .NET ecosystem today. We will keep things extremely practical. You will learn the exact steps to configure Serilog, how to write meaningful logs, and how to avoid the common mistakes that most beginners make.
Whether you are building a simple background service or reading our guide on building high-performance minimal APIs, having a solid logging strategy is non-negotiable. Let us dive in.
The Problem with Traditional Logging
Before we can appreciate the solution, we need to understand the problem. Let us look at how traditional logging works and why it fails at scale.
When most developers first learn to log information, they treat logs as simple string messages. You might write something like this in your code:
_logger.LogInformation($"User {userId} attempted to purchase item {itemId} but failed due to insufficient funds at {DateTime.UtcNow}");
On the surface, this looks completely fine. The log message tells you exactly what happened. If you are debugging locally and watching the console, you will see a nice, readable sentence.
However, think about what happens when this application goes into production and serves thousands of users. You will generate millions of these log entries. Now, imagine a customer support ticket comes in. A user named John says his purchase failed. You want to find out why.
How do you search for John's failed purchase in your logs?
Because the user ID and item ID are deeply embedded into the string message itself, you have to rely on complex regular expressions or full-text search to find what you need. If the format of the log message changes slightly in a future deployment, all your saved search queries will break.
Furthermore, plain text logs provide zero context. If you want to know what environment the error occurred in, which server processed the request, or what the correlation ID was, you have to manually include all of that information in every single string you write. This leads to messy code and massive, bloated log files that are incredibly difficult to parse.
What Exactly is Structured Logging?
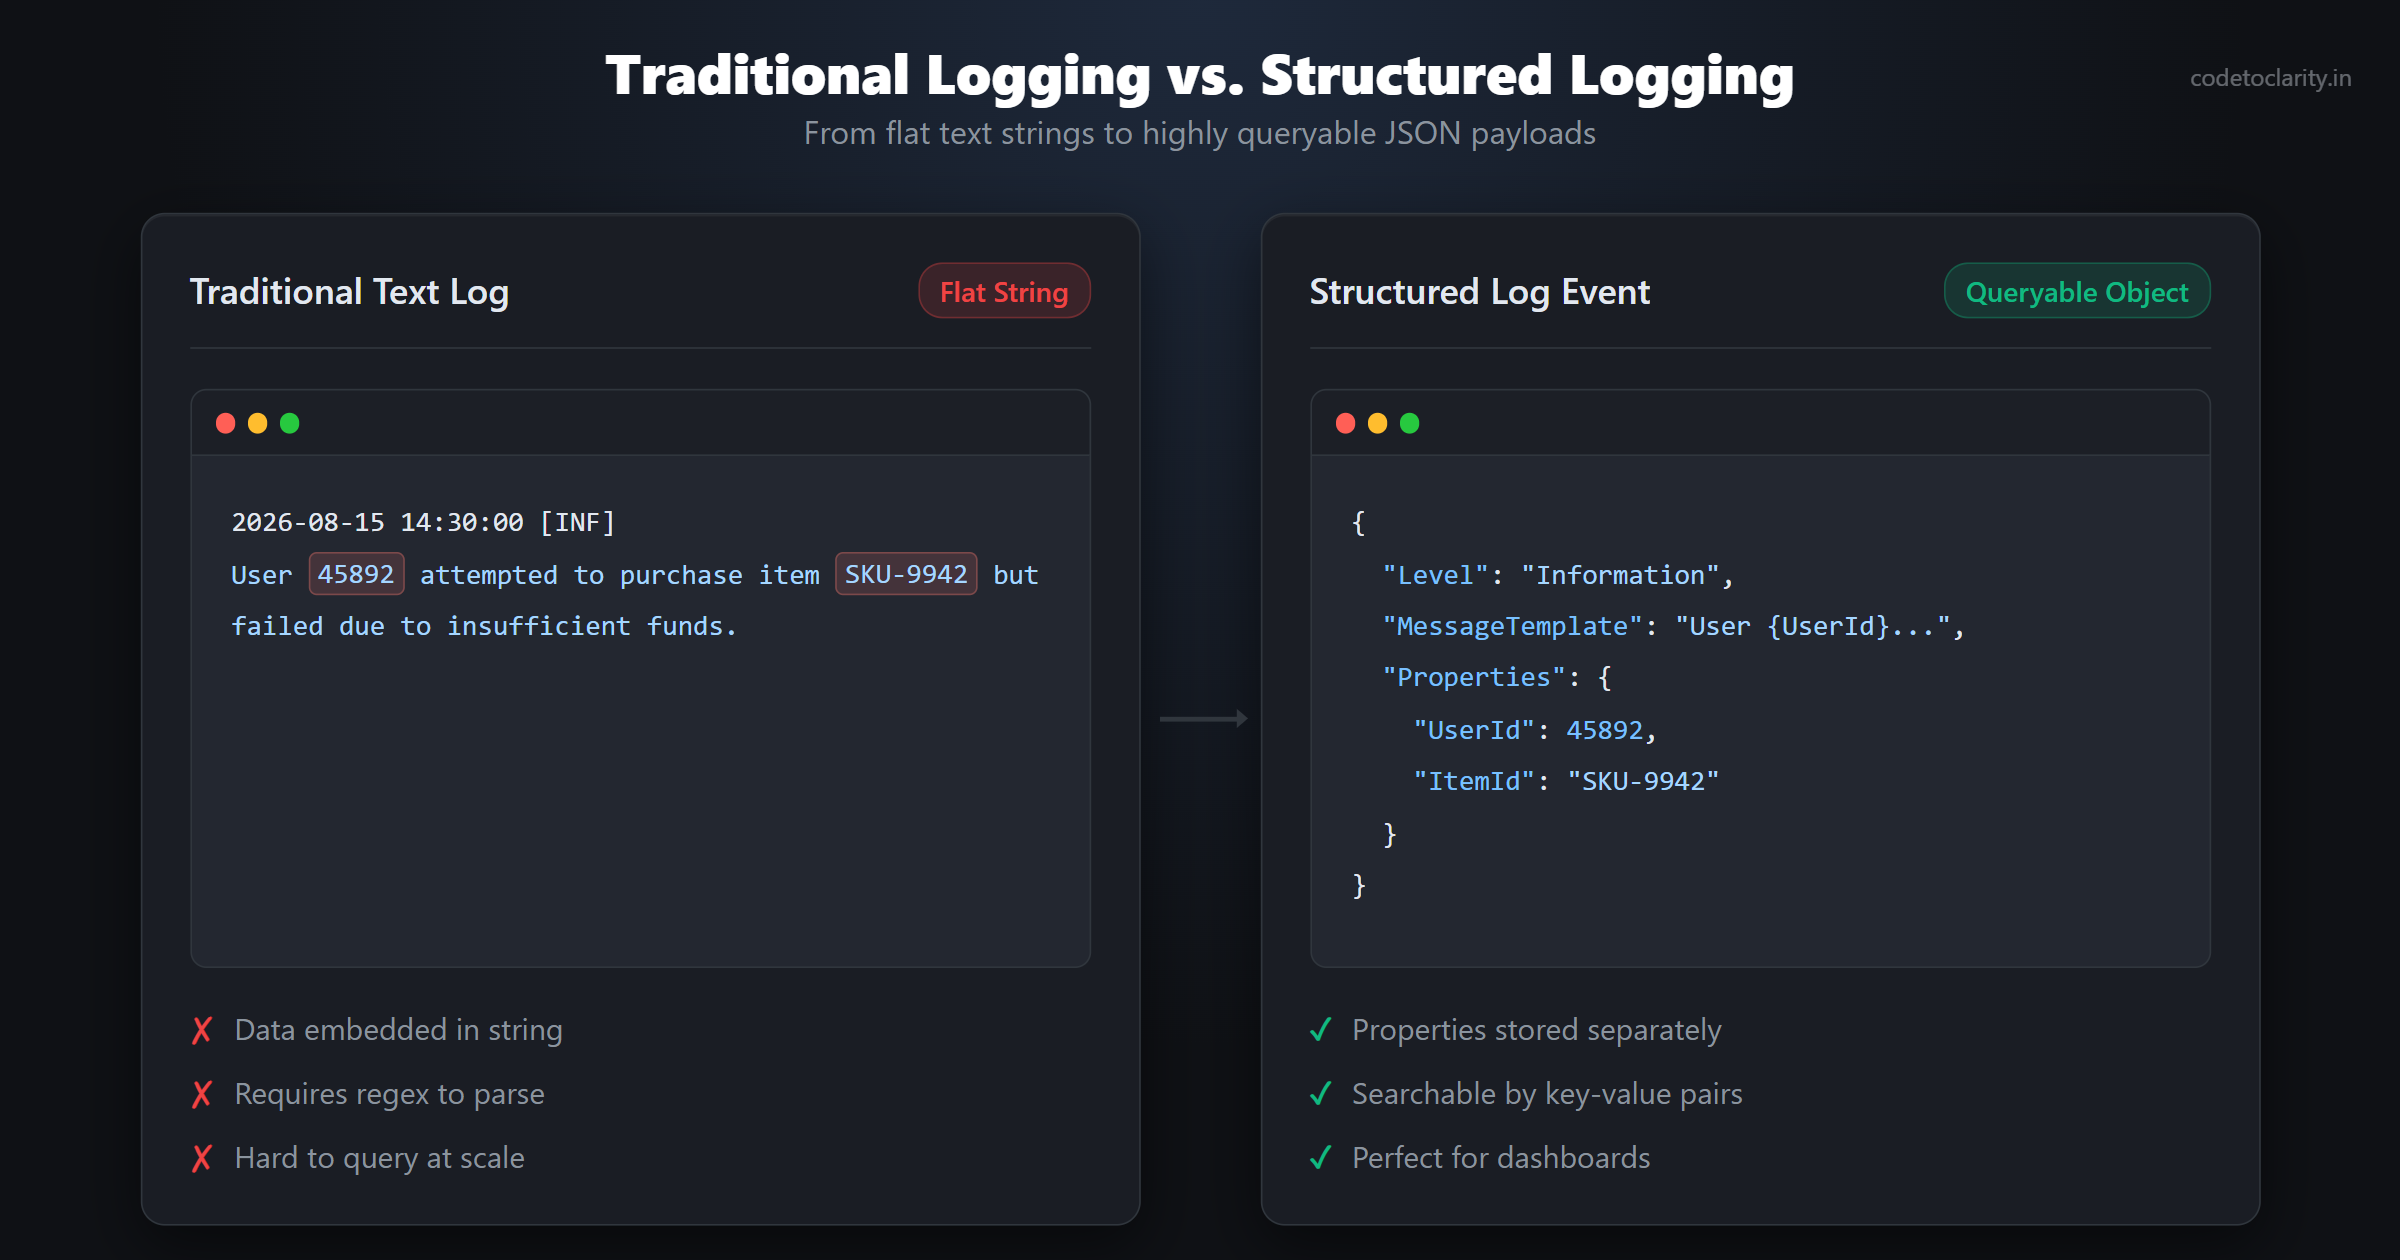
Structured logging takes a completely different approach. Instead of treating a log entry as a flat string of text, structured logging treats each log entry as an event with a set of distinct properties.
Let us rewrite the previous example using a structured logging approach:
_logger.LogInformation("User {UserId} attempted to purchase item {ItemId} but failed due to insufficient funds", userId, itemId);
Notice the subtle difference? We are no longer using string interpolation. We are not using the dollar sign to inject variables directly into the string. Instead, we are using a message template.
When a structured logging library like Serilog processes this line of code, it does two very important things. First, it renders the human-readable string for display purposes. Second, and more importantly, it captures the properties and values separately.
Behind the scenes, the log entry is often formatted as JSON and looks more like this:
{
  "Timestamp": "2026-08-15T14:30:00.123Z",
  "Level": "Information",
  "MessageTemplate": "User {UserId} attempted to purchase item {ItemId} but failed due to insufficient funds",
  "Properties": {
    "UserId": 45892,
    "ItemId": "SKU-9942"
  }
}
This is a monumental shift. Your log is no longer just text. It is a highly structured data payload.
Because the data is structured, you can now use specialized log management tools to run powerful queries. You can easily search for UserId == 45892. You can filter logs to show only entries where ItemId matches a specific value. You can even generate charts and graphs showing how many times a specific item failed to purchase over the last 24 hours.
This is the true power of structured logging. It turns your logs into actionable, queryable analytics data.
Why Choose Serilog for .NET?
Microsoft provides a built-in logging abstraction in .NET through the ILogger interface. You can read more about it in the official Microsoft Docs for logging. The built-in tools are great, but they often require additional configuration and third-party tools to achieve true structured logging capabilities.
This is where Serilog comes in. Serilog is designed from the ground up to be a structured logging library.
Here is why Serilog is the go-to choice for most .NET developers:
- Structured by Default: Serilog assumes you want to log structured data. Its entire API is built around message templates and capturing properties.
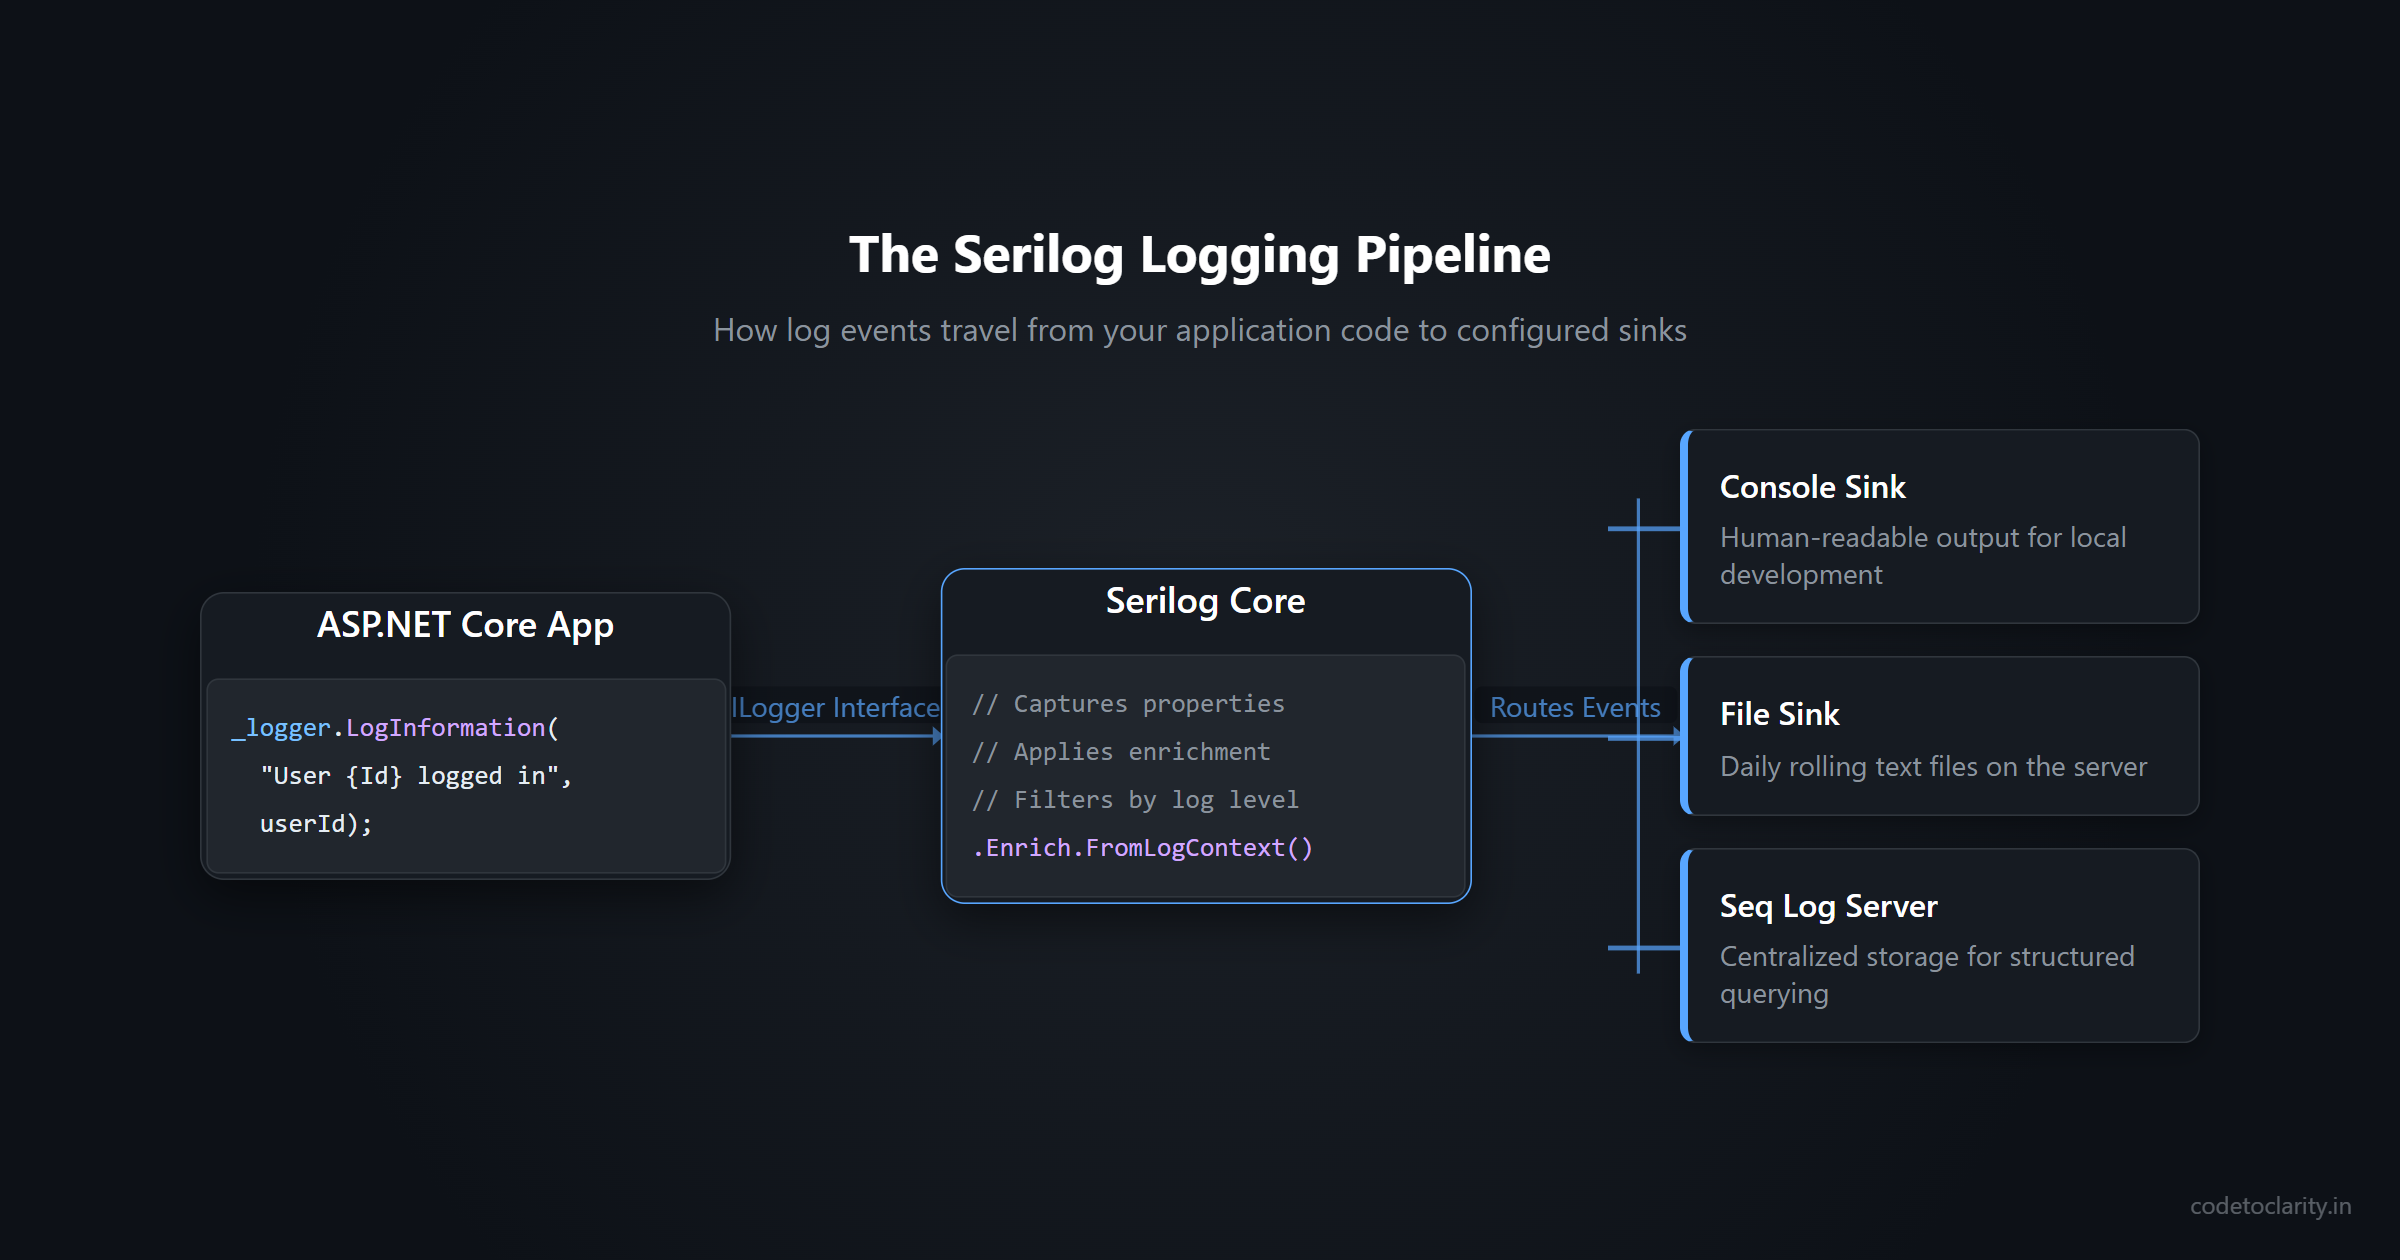
- Incredible Ecosystem of Sinks: A sink in Serilog terminology is simply a destination for your logs. Serilog supports writing logs to the console, to text files, to SQL databases, to Elasticsearch, to Azure Application Insights, and dozens of other destinations.
- Enrichment: Serilog allows you to automatically add properties to every single log entry. You can easily enrich your logs with the machine name, the current thread ID, or a unique correlation ID for tracking requests across microservices.
- Seamless Integration: Serilog integrates perfectly with the standard .NET
ILoggerinterface. You can configure Serilog once at application startup and then use the standard Microsoft logging interfaces everywhere else in your code.
If you are serious about application monitoring, implementing Serilog is one of the most impactful things you can do. Let us walk through the setup process step by step.
Step 1: Installing the Required NuGet Packages
We will assume you are starting with a standard .NET 8 Web API project. The first thing we need to do is install the necessary NuGet packages.
Open your terminal or package manager console and run the following commands:
dotnet add package Serilog.AspNetCore
dotnet add package Serilog.Sinks.Console
dotnet add package Serilog.Sinks.File
dotnet add package Serilog.Sinks.Seq
Let us break down what these packages actually do.
The Serilog.AspNetCore package is the most critical one. It contains the core Serilog library and the necessary integration components to wire Serilog into the ASP.NET Core request pipeline. It also replaces the default built-in logger.
The Sinks packages define where our logs will actually go. The Serilog.Sinks.Console package allows us to print nicely formatted logs to the terminal during local development. The Serilog.Sinks.File package lets us write logs to a text file on the server. The Serilog.Sinks.Seq package allows us to send our structured logs to a specialized log server called Seq, which we will discuss later in this guide.
Step 2: Configuring Serilog in Program.cs
With the packages installed, we need to configure Serilog when our application starts up.
In older versions of .NET, you might have configured logging in a Startup.cs file. In modern .NET 8 applications, all of this happens in Program.cs.
Open your Program.cs file and update it to look like this:
using Serilog;

var builder = WebApplication.CreateBuilder(args);

// Configure Serilog
Log.Logger = new LoggerConfiguration()
    .ReadFrom.Configuration(builder.Configuration)
    .Enrich.FromLogContext()
    .CreateLogger();

// Tell ASP.NET Core to use Serilog instead of the default logger
builder.Host.UseSerilog();

// Add services to the container
builder.Services.AddControllers();

var app = builder.Build();

// Enable automatic HTTP request logging
app.UseSerilogRequestLogging();

app.MapControllers();

app.Run();
There are a few very important things happening in this code.
First, we create a global logger configuration. We tell Serilog to read its settings from the application configuration. This is a best practice. You should always configure your sinks and log levels in appsettings.json rather than hardcoding them in C#. This allows you to change logging behavior without recompiling your application. If you want to learn more about how to manage configuration cleanly, check out our guide on the ASP.NET Core Options Pattern.
Next, we call builder.Host.UseSerilog(). This instructs the .NET hosting infrastructure to discard the default logger and route all internal framework logs through Serilog.
Finally, we call app.UseSerilogRequestLogging(). This is an incredible feature. It automatically logs a single, highly detailed event for every HTTP request your API processes. It captures the status code, the elapsed time, and the request path. It replaces the noisy, multi-line request logging that ASP.NET Core does by default.
Step 3: Setting Up Sinks via appsettings.json
Because we told Serilog to read from the configuration, we need to define our sinks in appsettings.json.
Open your appsettings.json file and add a "Serilog" section:
{
  "Serilog": {
    "Using": [ "Serilog.Sinks.Console", "Serilog.Sinks.File", "Serilog.Sinks.Seq" ],
    "MinimumLevel": {
      "Default": "Information",
      "Override": {
        "Microsoft": "Warning",
        "System": "Warning"
      }
    },
    "WriteTo": [
      {
        "Name": "Console"
      },
      {
        "Name": "File",
        "Args": {
          "path": "logs/codetoclarity-api.txt",
          "rollingInterval": "Day"
        }
      },
      {
        "Name": "Seq",
        "Args": {
          "serverUrl": "http://localhost:5341"
        }
      }
    ]
  },
  "AllowedHosts": "*"
}
This configuration tells Serilog exactly how to behave.
The MinimumLevel section controls the verbosity of your logs. We set the default level to Information. However, the ASP.NET Core framework generates a massive amount of internal logs. We use the Override feature to suppress logs from the Microsoft and System namespaces unless they are warnings or errors. This keeps our log output clean and focused on our own application code.
The WriteTo array defines our active sinks. We are writing to the console. We are writing to a daily rolling file in a logs directory. We are also writing to a local instance of Seq.
Step 4: Writing Perfect Structured Logs
Now that Serilog is fully configured, we can start writing logs in our controllers and services.
You inject ILogger<T> into your classes exactly as you normally would. Serilog handles the rest behind the scenes. Let us look at an example service:
public class CodeToClarityPaymentService
{
    private readonly ILogger<CodeToClarityPaymentService> _logger;

    public CodeToClarityPaymentService(ILogger<CodeToClarityPaymentService> logger)
    {
        _logger = logger;
    }

    public async Task ProcessPaymentAsync(int customerId, string orderNumber, decimal amount)
    {
        _logger.LogInformation(
            "Starting payment processing for Customer {CustomerId} on Order {OrderNumber}",
            customerId,
            orderNumber);

        try
        {
            // Simulate payment processing
            await Task.Delay(500);

            _logger.LogInformation(
                "Successfully processed payment of {Amount} for Order {OrderNumber}",
                amount,
                orderNumber);
        }
        catch (Exception ex)
        {
            _logger.LogError(
                ex,
                "Payment failed for Customer {CustomerId} on Order {OrderNumber}",
                customerId,
                orderNumber);

            throw;
        }
    }
}
The golden rule of structured logging is to never use C# string interpolation when writing log messages. Always use message templates.
In the code above, {CustomerId} and {OrderNumber} are the property names. Serilog extracts the values from the arguments passed after the string and attaches them as structured data properties.
If an exception occurs, we pass the exception object as the first parameter to LogError. Serilog will capture the entire stack trace and format it beautifully. Proper error logging is critical, and it pairs perfectly with a solid strategy for global exception handling in .NET.
Step 5: Viewing Logs in Seq
You can certainly view your structured logs as JSON in a text file. However, to truly unlock their power, you need a log server.
Seq is an incredible tool built specifically for viewing and querying structured logs. You can run Seq locally for free during development using Docker.
Once you have Seq running and your .NET application is sending logs to it, you can open the Seq dashboard in your browser.
You will see a live feed of your log events. You can click on any event to expand it and view all the captured properties. If you want to find all payment failures for a specific customer, you simply type a query like this into the Seq search bar:
CustomerId = 45892 and @Level = "Error"
Seq will instantly filter thousands of logs and show you exactly what you need. You can even create dashboards and alerts based on these properties. This level of visibility is absolutely essential when you are trying to implement true observability with traces, logs, and metrics in a production environment.
Step 6: Enriching Logs with Context
Sometimes, you need to add the same properties to multiple log events. For example, if a user is making a request, you might want to attach their User ID to every single log message generated during that request.
You do not want to manually pass the User ID into every log statement. Instead, you can use Serilog's LogContext to enrich your logs dynamically.
Here is how you can use a scoping mechanism to attach data:
using (_logger.BeginScope(new Dictionary<string, object> { { "UserId", currentUser.Id } }))
{
    _logger.LogInformation("Updating user profile");

    // Any logs generated inside this block, even in nested methods,
    // will automatically have the UserId property attached.
    await _codetoclarityService.SaveProfileAsync(currentUser);

    _logger.LogInformation("Profile update complete");
}
The BeginScope method creates a logical boundary. Any log events created within that boundary will inherit the properties defined in the scope. This is incredibly powerful for tracking complex transactions across multiple layers of your application architecture.
Bonus: High-Performance Logging in .NET 8
If you are building extremely high-traffic applications, the standard ILogger extension methods might introduce unnecessary memory allocations. Every time you call LogInformation, the framework has to parse the message template and box the arguments.
To solve this, .NET 8 introduced the [LoggerMessage] attribute and source generators. This allows the compiler to generate highly optimized logging code at compile time.
Here is how you use it:
public partial class CodeToClarityWorker
{
    private readonly ILogger<CodeToClarityWorker> _logger;

    public CodeToClarityWorker(ILogger<CodeToClarityWorker> logger)
    {
        _logger = logger;
    }

    [LoggerMessage(
        EventId = 1,
        Level = LogLevel.Information,
        Message = "Processing batch {BatchId} with {ItemCount} items")]
    public partial void LogBatchProcessing(string batchId, int itemCount);

    public void DoWork()
    {
        // Call the generated method instead of standard ILogger methods
        LogBatchProcessing("BATCH-994", 50);
    }
}
The compiler generates the implementation for LogBatchProcessing. This generated code is perfectly optimized. It avoids boxing and avoids parsing the template at runtime. Best of all, Serilog fully supports this pattern and will happily accept the high-performance logs and treat them as structured events.
Common Pitfalls and Best Practices
While Serilog makes structured logging very easy, there are still a few common mistakes developers make. Avoiding these pitfalls will ensure your logs remain useful, secure, and performant.
1. Logging Sensitive Information
One of the biggest risks of structured logging is accidentally logging Personally Identifiable Information or secrets. Because structured logs are often centralized in systems like Seq or Elasticsearch, logging a password, a credit card number, or an API key can result in a massive security breach.
Always be mindful of the objects you are passing into your log statements. If you pass an entire user object into a log using the destructuring operator, Serilog will serialize the entire object. If that object contains a password hash or a social security number, it will end up in your log server.
Instead of logging entire objects, create specific logging models or explicitly log only the safe properties. You can also configure Serilog destructuring policies to automatically mask sensitive fields.
2. Overusing the Destructuring Operator
Serilog provides a special operator that tells the library to serialize an object into JSON rather than just calling .ToString() on it.
// The @ symbol tells Serilog to serialize the entire request object
_logger.LogInformation("Received request payload: {@Request}", requestPayload);
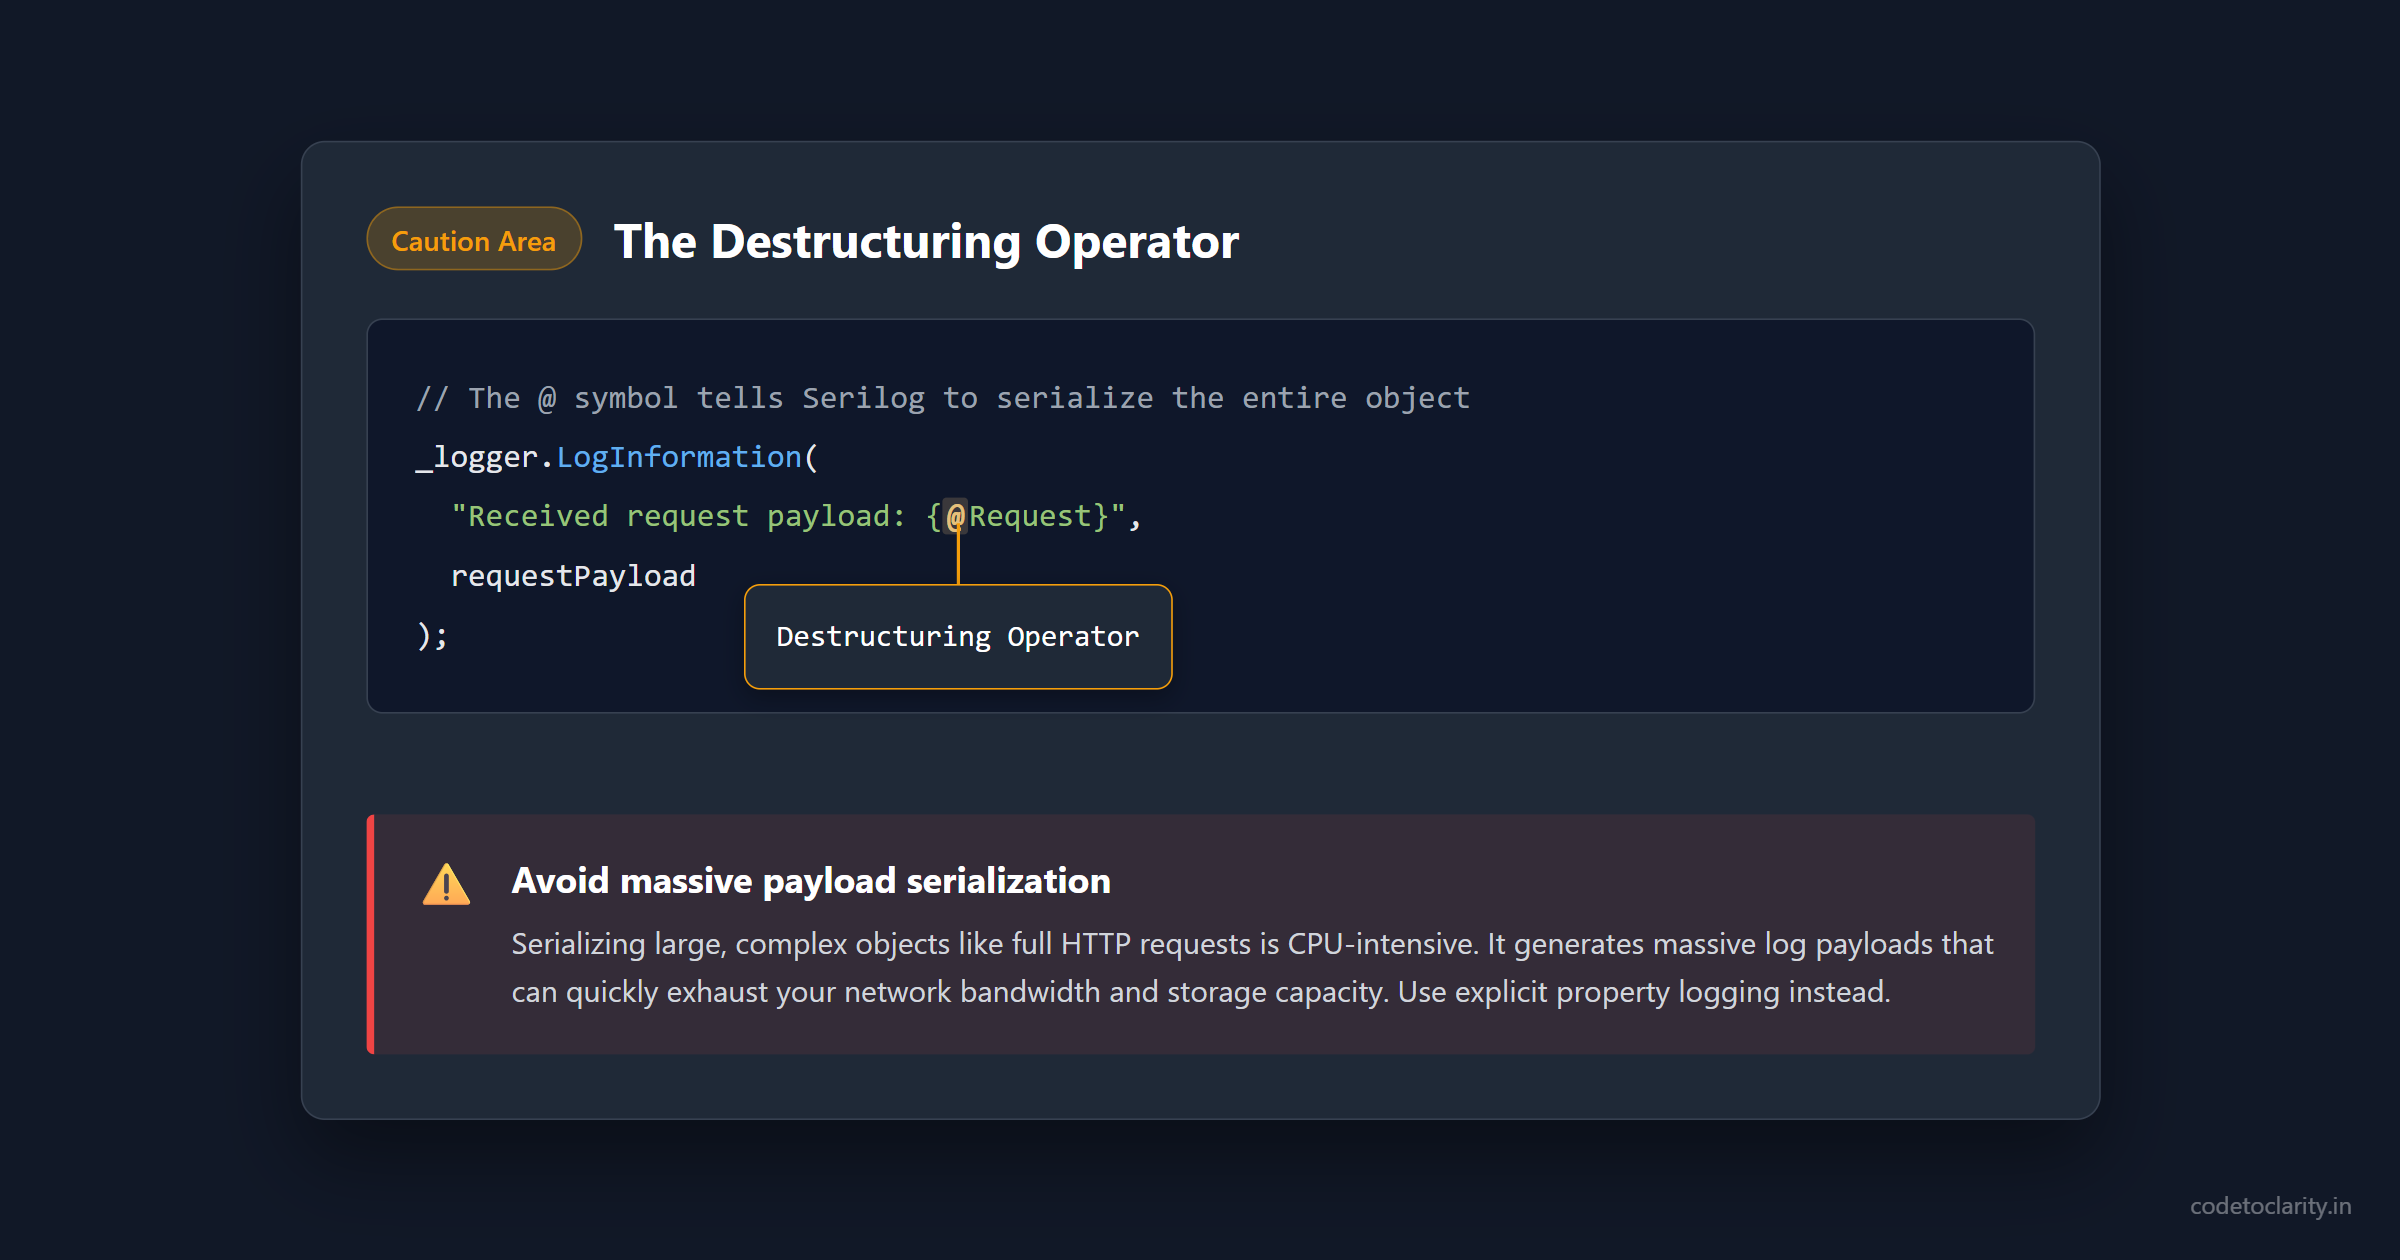
While this is incredibly useful for debugging, it can be dangerous in production. Serializing large, complex objects is CPU-intensive and generates massive log payloads. If you log a deeply nested object on every single request, you will quickly exhaust your network bandwidth and storage capacity. Use the destructuring operator sparingly and only for small, well-defined objects.
3. Ignoring Log Retention Policies
Structured logs take up disk space. If you are using the File sink or a local Seq instance, your logs will grow indefinitely unless you configure retention policies.
When configuring the File sink, always set a rolling interval and use the retained file count limit parameter to automatically delete old log files. If you are using Seq or Elasticsearch, configure data retention policies within those tools to automatically purge logs older than a specific timeframe. You rarely need to keep verbose application logs forever.
4. Not Using Appropriate Log Levels
Developers often overuse the Information log level. If you log every single minor event as Information, your logs will become too noisy to read.
Reserve Information for significant business events. Use Debug or Trace for granular diagnostic information, and configure your production environment to ignore those lower levels. Only use Error for actual exceptions that require investigation, and reserve Critical or Fatal for application-crashing scenarios.
Wrapping Up
Implementing structured logging with Serilog is a fundamental step in building mature, production-ready .NET applications.
We started by looking at the limitations of traditional text logging. We learned how structured logging treats logs as data rather than simple text. We walked through the process of installing Serilog, configuring it using appsettings.json, and writing perfect message templates. We also explored how to use tools like Seq to search our logs and how to use source generators for maximum performance.
Your logs are your primary window into the behavior of your application in production. By switching to Serilog and structured logging, you transform that blurry window into a crystal-clear, highly searchable dashboard. The next time you get an alert in the middle of the night, you will be very glad you have structured data to help you find the exact problem in seconds.

Kishan Kumar
Software Engineer / Tech Blogger
A passionate software engineer with experience in building scalable web applications and sharing knowledge through technical writing. Dedicated to continuous learning and community contribution.